How to create a new id in the app store. How to Create an Apple ID - All Methods. How to create an Apple ID without a credit card using a Mac or PC
If you have just started using Apple products, bought yourself an iPhone, iPad, iPod or a computer running Mac OS, then sooner or later the question appears - Where to get Apple ID? Basically, this question arises from novice users who do not know, or to another Apple device.
In fact, the Apple ID account provides other opportunities, in addition to purchasing and downloading applications, music and videos, the Apple ID is used when contacting digging support, orders from the online store, when using iCloud and iChat services.
Regular readers site already know where to get an Apple ID. In previous articles, we have already covered how to register an Apple ID without a credit card. We performed the registration procedure in two different ways:
- (without a computer, on iPhone / iPad)
- (using a computer)
You can create your Apple ID for free. If you are asked to send an SMS or pay money for registering an account, do not enter, this is a scam. Today we will take a look at the third method of registering an Apple ID account, which is performed using any web browser.
I warn you right away that this method has its drawback. After the Apple ID registration procedure, as soon as you want to use the created account, the system will display the following message:
“This Apple ID name has not yet been used in the iTunes Store. Review your account information. "
Then you need to enter your payment card number. Therefore, if you have not yet acquired a payment card or do not want to link it to your Apple ID yet, then register an account without linking to a credit card, using the links above, otherwise you will not be able to download free applications from the AppStore.

We will register Apple ID using a computer, but in general, you can open the Safari browser on the iPad or iPhone itself (of course), and go through the account creation procedure with the same success.
1. Launch Safary, Opera, Google Chrome, Internet Explorer or Firefox and enter in the address bar: Appleid.apple.com/ru/, or just follow the link

2. A page will open titled " My Apple ID», If the page is in English, then in the lower right corner there is a round icon with a flag, by clicking which you can select your country or region. If you register a Russian account, choose Russia, if you need an American account - USA.

3. Press the blue button - Creating an Apple ID to start the registration procedure

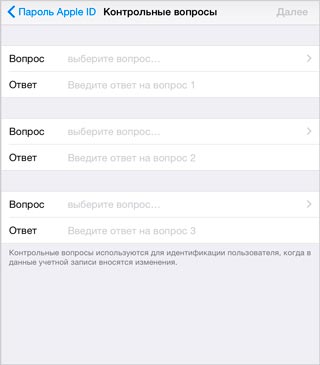
4. Creating an Apple ID begins by entering an email address, which will later be used as the Apple ID. Below we enter the password and confirm it again, enter the password in English, and follow the recommendations about which we are. Although the procedure for creating an Apple ID in the browser is very convenient, so this time there should be no problems with the password. As soon as all the items of the tooltip turn green, it means that the password was entered correctly and meets the security requirements. Having dealt with the password, select the security question and answer

5. Next, fill in, first and last name, patronymic is optional.

6. The country should already be standing, it remains to enter your address, city and language

7. After filling in all the data, you must enter the characters (antispam), check the box and press the button - Create Apple ID
8. Upon completion, the registration system will ask you to check your mail and confirm your email address, for this enter your E-mail, open the letter from Apple and click - Confirm Now>

9. In the page that opens, enter your Email, which is now Apple ID, enter the password that we filled out in paragraph 4 and press the button - Confirm Address... After that, your email address will be verified and linked to your Apple ID.
Perhaps that's all, now you know another way to get a new Apple ID, or rather how to create one. There are other ways to get your free Apple ID, which are linked at the beginning of this article. Using the identifier, you can install applications and games on your iPhone, iPad and iPod touch, but first you need to.
The App Store is one of the reasons many people choose iOS devices. In the Apple app store, you can find not only a lot of games, but also a lot of useful programs that can significantly simplify the life of the owners of mobile devices. Another thing is that without an Apple ID, which is the key to Apple's services, it is not possible to use the App Store or the iTunes Store as a whole. Therefore, to be able to enjoy the full benefits of using an iPhone or iPad, you must first create an Apple ID account.
Contents of the instruction You can create a new Apple ID both on the iPhone itself, and using a computer, through the iTunes program, or even do it through a browser from any device that has access to the Network. Each of the indicated methods is convenient and justified in its own way in certain life situations.
How to create an Apple ID through iTunes
Launch iTunes on your computer and look for the "Login" button in the upper right corner. We click on it and in the window that opens, prompting us to either enter the existing Apple ID or create a new one, select “Create Apple ID”.
Here we need to specify an active e-mail, password, select security questions and give answers to them, indicate the date of birth and, if possible, a backup e-mail. Unlike registering an Apple ID with an iPhone or iPad (see below), iTunes does not offer to create a new @ icloud.com mailbox, so you must have an e-mail and, importantly, an active one.
After entering the necessary information, you will be transferred to the next page, where you must specify the payment method.

If you use a bank card, this stage of registration will not cause you any difficulties. Otherwise, read the instructions below.
How to create an Apple ID account without a card
The method of creating an Apple ID through iTunes requires at one of the registration stages to select a payment method and provide a bank card number. For some, this can be a problem, which, however, is very easy to solve.You can create an Apple ID account without a card in iTunes. Launch iTunes and go to iTunes Store> App Store.

Here we are interested in any free application. We choose what we like and try to download it.

In this case, of course, the program will immediately offer us either to specify the Apple ID, or to create a new one. We agree to create a new one and go through the same procedure for filling in the data described above. Moreover, at the stage of specifying the payment method, a pleasant surprise awaits us - the opportunity to refuse to choose a card.

We select “No” in the line “Payment method”, after which we only need to fill in the “Billing address” section. There will no longer be a requirement to specify an iTunes card. Do not forget to check your mailbox afterwards and activate the created account.
You can also create an Apple ID without a card on the iPhone in the device settings. Here's how to do it.
How to create Apple ID on iPhone, iPad
You can create an Apple ID on an iPhone or iPad in the following ways:- when activating the device using the "Setup Assistant" program;
- in the device settings;
- via App Store or iTunes Store apps;
- on the My Apple ID website.
You can create a new Apple ID right away when you activate your device using Setup Assistant. That is, having brought home a brand new iPhone or iPad, you can immediately get an Apple ID in the process of activating and setting it up. This is very easy to do. We hold down the Power button, located on the iPhone 6 and iPhone 6 Plus on the side panel, and on earlier models on the top, and wait until the apple appears on the screen - the Apple logo. Next, we are greeted by the "Setup Assistant" program, following the instructions of which you can create a new Apple ID.
2. Create Apple ID on iPhone or iPad through the Settings app.
If the device is already activated, you can create a new Apple ID directly in the iPhone or iPad settings. To do this, launch the "Settings" application and go to the iCloud section. Here you can find the coveted "Create Apple ID" button.

By tapping on it, we will be asked to indicate our date of birth, first and last name, e-mail, password, go through the stage of security questions, and so on.

After going through all the registration steps, you can safely use the newly created Apple iD in the App Store. However, when trying to buy something in the App Store or iTunes Store, users of the Apple ID created in this way have to go through a number of stages, including specifying the payment method. Interestingly, the Apple store will not be required to provide a bank card number.
3. Create Apple ID on iPhone or iPad via App Store or iTunes Store (App Store registration)
Similarly to the method described above, you can create an Apple ID through the App Store or iTunes Store applications. To do this, you need to launch one of the two applications to choose from and go to the first section. For example, in the App Store, this would be Collection. Here, at the very bottom of the page, there is a panel with quick links, under which there is a button "Login". When you tap on the button, we will be asked to choose how we want to enter the App Store: with the existing Apple ID or create a new one. We select "Create Apple ID" and patiently go through all the necessary registration steps.

Accordingly, if you already have an Apple ID, but there is a need to create a new one, you can simply sign out of your iCloud, App Store or iTunes Store accounts and follow the instructions described above.
4. Creating an Apple ID on the My Apple ID page.
So, open the page "My Apple ID" and pay attention to the button "Create Apple ID".

Here we are again waiting for a number of fields for data entry. We need to indicate the full name, e-mail, which will be used as an Apple ID, come up with a password, choose and answer security questions, indicate the date of birth, mailing address and preferred language.

After that, you must confirm the e-mail without fail. To do this, you will need to open your mail, find and open a letter from Apple. Then follow the link "Confirm now" and sign in with your new Apple ID and password.
How to create an American Apple ID
It happens that the program or game you are interested in is not in the Russian segment of the App Store, but at the same time it is available for download in the American or New Zealand segments, which cannot be accessed without a “local” account. This happens, for example, with an application. How to create an American Apple ID, as well as New Zealand, Canadian, Australian and so on.Creating an American Apple ID account is no different from creating a Russian one, with the only difference that when registering an Apple ID, at one of the stages, you must specify the country whose App Store segment you want to access.
If you did not find the answer to your question or something did not work out for you, and there is no suitable solution in the comments below, ask your question through ours. It's fast, simple, convenient and doesn't require registration. You will find answers to your own and other questions in the section.
All those who have switched to an iPhone are probably interested in how to create an Apple ID. After all, it is this identifier that allows you to download games and applications, as well as use other services of Apple services. In fact, this is the same Google account that Android users use for the same purposes.
The full list of features that Apple ID provides on iPhone or other Apple devices is as follows:
- Installing App Store applications;
- Using iCloud, Apple's cloud, which makes it possible to store all data without the risk of losing it;
- Using iMessage, FaceTime and other instant messengers;
- Find your Apple device if it's lost or stolen.
Now let's move on directly to the creation of this very Apple ID.
Method number 1. App Store
Most users use this particular method, since it is the simplest and no special knowledge is required to complete it.
So, to create an account with Apple on iPhone, you need to do the following:
- We go to the App Store through the corresponding button on the desktop.

- Choose absolutely any free application. It is better to choose what you really need, because at first, without Apple ID, the system will not allow you to install it, but then it will be installed anyway. On the application page, click on the "Free" button.

Prompt: To select free applications, at the bottom of the App Store window, click the "Top Charts" button and select the "Free" category. You can also use the search.
- The "Free" button will be replaced with "Install". Click on it too.

- After that, a window will appear in which you will need to choose whether to download the application from the existing Apple ID or create a new one. In our case, click the "Create Apple ID" button.

- In the next window, you will need to select your country. If the iPhone was purchased in Russia, this country will be the default. The same goes for the rest. To select another country, you just need to click on the inscription of the country (in Figure 5 it is Russia) and click on the required country in the drop-down list. After that, at the bottom of the page, click the "Next" button.

- In the next window we will be asked to read the license agreement. It is quite extensive here, but it is advisable to read it in full. After reading, you will need to click the "Accept" button at the bottom of the page.

- Press the "Accept" button again. If in doubt, click Cancel. This is a simple "fool test" in programmer terms.

- In the next window, you will need to enter your email address and come up with a password, and then enter it twice in the appropriate fields. Here you can use absolutely any e-mail you have, Apple does not make any restrictions.

Important: The Apple ID password must meet certain requirements. So it must be at least eight characters long, contain numbers, one capital letter and one small letter. Otherwise, the system will not accept such a password and will ask you to come up with a new one. It is also advisable not to use the same characters in the password.
- Now you will need to select three security questions and write down the answers to them. This is done in cases when the user forgets his data and needs to be restored.

- After that, you are prompted to enter a backup email address. Again, it is needed in case of data loss. Although this is not necessary, it is best to enter an additional e-mail address.

- After that, you must indicate your date of birth by clicking on the appropriate item and choosing the desired option.

- You can now subscribe to iTunes Store news and other Apple newsletters. In most cases, users refuse such services. To do this, you just need to click on the appropriate switch (in Figure 12, these are circled in green ovals). After that, click the "Next" button at the bottom of the page.

- Next, you should indicate your payment information - the type of plastic card and its number. After completing these steps, you will need to click the "Next" button at the bottom of the page.

Prompt: You can create an account without a credit card. To do this, you just need to click on the inscription "No" (highlighted in blue in Figure 13) on the page for specifying the details for payment. But without a credit card, you won't be able to purchase paid apps.
- We indicate contact information - last name, first name, residential address, phone number and other information. All this is necessary in case you need to issue an invoice for any services, but there is no data on the bank card. After that, click the "Next" button at the bottom of the page again.

- Now you need to look at the email address you specified earlier. It will receive a letter with a password, which will need to be entered into the window shown in Figure 15 and click the "OK" button.

That's all. Now you can freely use all the features of Apple ID on your iPhone. Interestingly, you can create a new ID even if you have an existing one. Now let's talk about the second way to create an Apple ID.
Method number 2. iTunes
After the program is downloaded and installed, you need to do the following:
- Launch the iTunes program and in the iTunes Store (you can select this on the left panel) select any free application and click on the "Free" button next to it (such buttons are shown in red lines in Figure 16). In the window that opens, click on the "Create Apple ID" button.

- In the window that opens, click the "Continue" button. This is the Apple ID presentation page.

- Next, we will be prompted to read a large license agreement. It is advisable to do this, and then press the button "I Agree", that is, "I agree."

- On the next page, we indicate all the same information as for the first method, that is, an email address, a password, three secret questions, an additional e-mail and date of birth. Only here all this is collected on one page, and not on several.

- On the next page, you will need to provide your billing information. Most likely, you are not located in the United States, so you will need to indicate this by clicking on the “click here” inscription at the top of the page (highlighted with a red line in Figure 20). The billing information page itself will look exactly the same as shown in this figure, except that instead of state lines, there will be country and region lines. After filling out this information, you need to click the "Create Apple ID" button.

- On the next page, specify your address and click the "Create Apple ID" button again.

- After that, the program will show a message that a letter should come to the mail with a link to confirm registration. We go to the mail, find a link there and confirm.
In the video below, you can clearly see how an Apple ID is created in iTunes on a computer.
My name is Sergey and today I will show you how you can create an Apple ID on your iPhone and computer. That is, we will consider separately, first the option with the iPhone, and then with the computer.
There is nothing complicated here, but again the topic is relevant. I watched the statistics and every month several thousand people are looking online for information on how to create an Apple ID, in particular without a credit card.
So let's go!
How to create an Apple ID on iPhone?
The first step is to consider all this on an iPhone. Therefore, we take our smartphone in hand and repeat after me. Find the standard App Store application and launch it.

Here at the very beginning is an important point. You need to select a free application and go to the download page. Next, I'll tell you why we are doing this.

I chose this toy. Click Download and Install in a second.


We are told, they say, you need to sign in, or "Create an Apple ID". Naturally, we press the second item.

The registration process begins. The first step is to choose a country. I will choose Ukraine. If, let's say, you need Russia, then it will most likely be substituted automatically, and if not, then scroll through the list and find the required country. After selecting, click Next.

We accept the terms of the agreement. Click Accept and Accept again.


Next, you need to enter your real email address. I recommend using Gmail. Coming up with a password. Please note here that the password must contain both letters and numbers and must contain at least one uppercase, that is, a capital letter. For example, I created the password Testpass1234.

I go down below and here, to ensure safety, you need to choose three different questions and answer them. This data will be needed if you suddenly lose access to your Apple ID, that is, if, for example, you forget your password or something like that.

We filled in the answers to the questions and we go down even lower. You can enter additional email addresses here, but this is not required.

Even below, we enter the date of our birth. Please note that if you are under 18 years old, you will not be allowed to register. Therefore, indicate the year so that you are 18 years old.


The next step in registration is to add a credit card for your Apple ID. Remember in the beginning we tried to download a free app. We did this so that there was an opportunity here not to indicate your card. There is an item here No. We choose it!

We chose it, go down and enter our data. Name, surname, street, house number, city and zip code.

And at the bottom we are asked to enter a mobile phone number. I will try to enter not the real one, I hope it will work. So, it seems like nothing else needs to be filled in here. Click Next.

We are told that a verification letter has been sent to our mail. You need to follow the link there.

I immediately received a message in my mail, there I need to find a link to confirm. Click, "Confirm Address".

Enter the password that was used during registration.


And the account is verified. Throws us back to the App Store and again asked to enter a password, do not be surprised, here you always need a password. I sometimes wonder how long you can enter a password each time.

Now we are trying to Install and Download this toy again.

No, well, they are kidding, again you need to enter the password. OK.

So, you can remember the password for 15 minutes. Ooh ... for 15 minutes, I won't be asked for a password. Really. Good.


Well, everything is ready, go to the last screen and here is our downloaded and installed game.

By the way, if we return to the first page of the Selection in the App Store and go down to the very bottom, we can make sure here that the Apple ID is now logged in.

How do I create an Apple ID from a computer?
If you have any errors when creating an Apple ID on an iPhone, or if you are simply not comfortable entering all the data on your phone, you can create an Apple ID from your computer. It seems to me it's even easier!
Go to the Apple website https://appleid.apple.com and find the Create Apple ID link. We press it.
As with creating an Apple ID on the iPhone, we need to fill in a bunch of fields here. Mail, password, answers to 3 security questions and a security code. Fill in and click Continue.

To confirm the address, you need to enter the code that was sent to me by mail.

I found the code and it is 619221.

I go back and put it in the form.

Well, that's it. In this case, we were not even asked to indicate our card details, name, address. Although there is this data to add.

Well, let's now go back to the iPhone and see if they let us through with this username and password.
Launch the App Store again and go to the very bottom. Click Login and fill out.


We are told that this Apple ID has not yet been used in the iTunes Store and we need to click View.

Still, you have to choose a country, accept the terms of the agreement and enter your data. Here, because without them it does not pass. You must at least indicate the country, enter the name, address and city.
After filling in all the fields, we are told that an account for the iTunes Store has now been created.

Now you can try to download something with this Apple ID.

Well, as you can see, you can register both on an iPhone and on a computer.
Registering for the iTunes Store in iTunes
There is another way to register. If you need to create an Apple ID so that later on the phone you do not need to enter the rest of the data, then for this we need to register on the computer through the iTunes program. I remembered the first time I registered to download applications, I did it through iTunes.
There, too, you can select a free application and try to download it, we will be prompted to either log in or create a new account. We naturally choose to create an account and fill in the fields that are already familiar to us.


Well friends, we have figured out this issue and once again I will remind you that so that you are not asked for your card details at the registration stage, but there was an item NO, you need to remember to choose a free application at the beginning.
That's all, creating an Apple ID on an iPhone or computer is very simple. See you in new lessons and articles. Bye!
An Apple ID is a unique username that is needed by anyone who is a potential customer for the iCloud service supported by Apple devices. It should be noted that this platform is needed to make various purchases on the AppStore and iTunes Store. No less important is the fact that users of American gadgets using Apple ID can order goods from the manufacturer online, and also contact Apple technical support, if necessary.
There may be several reasons why the iPhone owner wants to change his ID. Most often, users have to change their username after purchasing a used device, when the new owner simply does not know the unique name previously assigned to the gadget. It is not at all difficult to create a new ID, it is only important to remember a few fundamental subtleties, on which the success of the venture directly depends.
First of all, an iPhone or iPad consumer should know that it is possible to change Apple ID directly from the device, which significantly reduces the time spent on the procedure. The user does not need to additionally register on the manufacturer's website. The data in the phone or tablet memory will not disappear anywhere, photos, contacts and previously installed applications will be saved. In addition, the owner's credit card is not required to create a new ID.
Quick way to change username in Apple app
So, if the user of the device purchased a previously used device and knows the ID of the previous owner, but wants to change the old ID to his own in his iPhone, follow the instructions below.

Some iPhone users may for a long time neglect their direct advantages, which lie in the ability to download and install new software products located in the AppStore on the gadget.
In order for the purchased device to bring not only joy, but also benefit, you should understand the principle of changing the username in the manufacturer's program.
Create a new account
If, for example, there is a need to create an Apple ID for the first time on iPhone 5s, the user must register by creating a new unique name in the developer program. When buying a new device, do not neglect setting up an Apple ID, as it is this that is strategically important.
Account change
If you need to change the previous Apple ID on your iPhone, you need to enter information that allows you to use iCloud services. Modern gadgets, in particular the iPhone, have at least two places where you can enter the relevant data. More convenience for the user will provide passage to the following address: Settings -> iCloud. After the application window opens, the previous account will most likely appear on the screen, if you do not know the existing password, no known trick will allow you to leave your account. In view of this circumstance, when purchasing a supported gadget, it makes sense to ask the former owner for the password for the account, otherwise the new owner will not be able to change it in the future. If the password is known, you should scroll through the window that opens to the "Exit" button and click on it.

The third step to help you change your account is registering with the iCloud app. If, by a lucky chance, the field for entering data in iCloud turned out to be empty, you just need to enter your personal data into it and click on the "Login" command. You should not wait for a lightning-fast response from the program, since the verification of the recording can sometimes take more than a minute.
So, if you change the ID on the iPhone, you can get free access to such a modern "storage" of information as cloud storage. It is worth noting that iCloud reserves 5 GB for its users. With iCloud, you can save copies of information blocks on your iPhone. An important advantage is the ability to quickly synchronize any data, for example, contacts and calendars, between several standard devices that were created by an American manufacturer.
Among other things, those who decide to change their Apple ID to an iPhone will be able to find the phone if it is lost or stolen. Activation of this application is the very strategically important thing that will help the owner even remotely lock the gadget, delete all personal data from it, and also track its location on the world map.

Benefits of the iCloud App
After the user has managed to create or change an Apple ID on the iPhone, he will be able to use the iCloud service indefinitely by purchasing goods in the iTunes Store and AppStore. As described earlier, American-made phones and tablets have two locations that need to be entered into a personal account. After all the above steps have been completed, you should re-enter the gadget settings and select the iTunes Store and AppStore programs. The instructions describing the second step of actions will help to change everything, the user, again, will not need specialized passwords, he will only have to log out of the old account and enter new credentials.

The performed manipulation allows you to change the previous account registered by the former owner to a new one that the current owner of the device was able to create. With the entered Apple ID, you can buy goods in the iTunes Store and AppStore. It is important to know that purchases made will be recorded and saved directly under the user's personal name. Thanks to this, once purchased goods do not have to be purchased several times if they are lost, and applications for which the agreed amount will be paid will be constantly in use by the owner.
In view of this circumstance, the user has the opportunity to enter in the iCloud program not only his own personal data, but also other people's. To some, this behavior may seem strange and illegal, because the introduction of someone else's username makes it possible to download for free everything that was previously acquired by the previous owner. Today, on the vastness of the World Wide Web, you can find many services that, for a certain fee (relatively small), allow everyone to use specialized general accounts, in particular, accounts that have an impressive base of various purchased programs.
Conclusion
The gadgets of the American manufacturer Apple attract users from all over the world with their popularity, capabilities and extensive functionality. Almost every modern person wants to have a world-famous device that provides its owner with a lot of opportunities and advantages. To take advantage of all the delights of an iPhone or iPad developed by American software engineers, you can create a unique account, which should be on each device. As it became clear from the above material, it is quite simple to create or change an ID, it will take very little time and effort.