Hover window activation windows 10. How to enable automatic window activation when hovering over. I) Enabling automatic activation of the window when hovering the cursor through the control panel
I) Switching on through the "Control Panel"
II) Inclusion through the registry
The first option is simpler, but has no settings; the second option is a bit more complicated, but allows you to set the time after which the window is activated and brought to the foreground.
I) Enabling automatic activation of the window when hovering the cursor through the control panel.
1) Open the control panel. For this we open windows explorer and at the top of the window, click the "Open Control Panel" button.
Windows 7 and Windows Vista: 
2) Open the section "Special features":


4) Put a tick in the checkbox "Activate the window when you move the mouse pointer over it":

II. Enabling Window Hover Activation via Registry
Now let's go the other way. As Susanin said, "Everyone is behind me, I know a short cut" =)
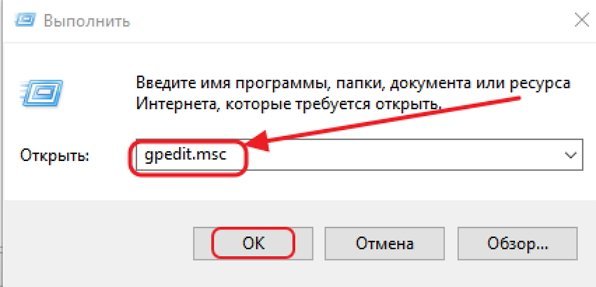
1) Open the registry, for this we press the Win + R combination and in the window that opens, enter:

HKEY_CURRENT_USER\Control Panel\Desktop

3) We need a parameter UserPreferencesMask:

We are interested in the first byte 9E. If we replace it with 9F, the window will be activated but not brought to the foreground. If you set the value D.F., the windows will be activated and brought to the front.
4) Right-click on the parameter and select "Edit". In the window that opens, change the first byte to D.F. or 9F optional. I write the value D.F..

5) Also in this registry branch, you can change the value of the waiting period before activating the window. To do this, go to the parameter ActiveWndTrkTimeout.
One of the convenient features of the Linux X-Window graphics subsystem is the ability to automatically activate the application window when you hover over it with the mouse cursor. Many users really like this feature, and when working with Windows, it is not enough for many, because in the standard Windows configuration, you need to click on it to activate the desired window.
The technology of activating the window when hovering over the cursor is called the term Activation follows mouse or X-mouse(not to be confused with the program of the same name for redefining mouse buttons). Let's try to figure out how you can activate the X-Mouse function in different versions of Windows.
Hover Window Activation in Windows XP
In Windows XP, there is no option to enable X-Mouse via GUI OS. You can enable this mode only through the registry (or using special utilities, which, in fact, also edit the registry, such as TweakUI, TaskSwitchXP or VistaSwitcher) .
Note.
- To disable the mode of automatic window activation and bringing it to the foreground, the value of the key must be changed to its original value: 9E 3E 01 80
- X-Mouse mode is activated for the current user. If you need to change the setting for another user, you need to edit it in the user branch in the HKEY_USERS section
- With another key ActiveWndTrkTimeout in the same registry branch, you can configure the time during which the window becomes active when hovering over the mouse. The recommended value of the parameter is 300 (3 seconds)
X-Mouse mode in Windows 7 and Windows 8
In Windows 7/8, it is much easier to turn on the automatic window activation mode when you hover over it with the cursor. We do not have to resort to manual modification of the registry. Just open the control panel and go to the section Ease of Access Center ->Make the mouse easier to use(Ease of Access Center - Make it easier to work with the mouse), check the box - Activate a window by hovering over it with the mouse(Activate the window when you hover over it with the mouse) and save the changes.

You can change the time delay during which the window, on which the cursor becomes active, can be done through the registry in the way described above (key ActiveWndTrkTimeout).
So, we figured out how, in various versions of Windows, you can enable the switching mode from active to inactive window using a simple mouse hover without having to click on it.
After initial installation operating system Windows 10 from removable media, you need to activate it to confirm the license rights to own this version. This is required in order to exclude the use of pirated content and verification license key product with valid Microsoft keys. Before the key is entered, the system will work in trial mode for thirty days, after which it will stop starting. Within the specified period, the user is obliged to activate or uninstall the system. Windows 10 will automatically remind you to activate it every time you start it by displaying a watermark with reminder text in the lower right corner of the display. This sometimes annoys many users, which is why they start looking for ways to remove the auto-pop-up label. The removal process itself is not difficult and does not require special training.
Why does the Windows 10 activation watermark appear?
An activation reminder watermark may appear in test versions, in pirated copies of a licensed OS, or if the user for some reason forgot to swipe Windows activation 10 after the installation is completed on the computer.
Windows 10 activation message appears on desktopThis feature is fixed in the registry and has no effect on the speed and performance of the computer. You can also use an unactivated version of Windows 10 (with some restrictions), but this is not very convenient. Most users try to remove the annoying reminder with third party programs or editing branches in the registry.
There are a certain number of rules that must be followed when removing the watermark that reminds you of activation, since in most cases it is used software third party developer. Often, not everyone wants to take risks and change registry entries, rightly fearing to disrupt the normal operation of the computer.
Basic rules to follow when removing a watermark:
- always create a system restore point before you start deleting a watermark using the registry;
- use software only from official websites of manufacturers;
- watermark removal and activation reminder methods should have good recommendations on the net and be tested many times.
If you do not follow at least one of these rules, then no one guarantees you that the result of removing a small problem will not become a big problem, entailing a complete reinstalling Windows 10.
How to remove the inscription about the activation of Windows 10
There are several ways to remove the automatic system reminder to activate software. Sometimes the result is achieved immediately, sometimes you need to sort out several ways to achieve success. The main ways to remove the Windows 10 activation watermark include using programs third party developers and updating the registry. In addition, you can use the built-in software of the system, but in home versions, not all functions for removing notifications are included in the installation Windows package 10.
How to remove the activation inscription through the registry
There are two most simple ways remove the activation label.
First way:

The second way (for those who are afraid to manually enter the registry update):

Remove notification about activation by third-party programs
You can remove the watermark that says you need to activate Windows 10 using third-party programs. There are several such programs, and they have been repeatedly tested in practice by various user groups.
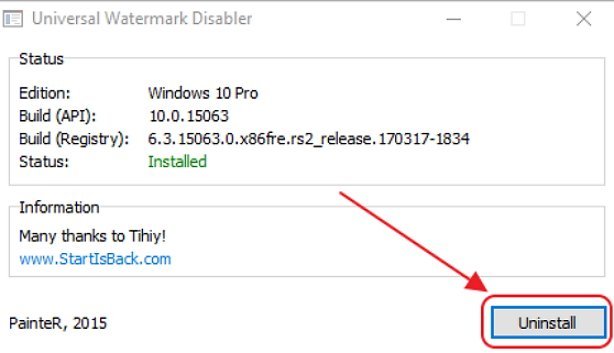
The Universal Watermark Disabler utility has the following advantages:
- can quickly remove watermarks on any version of Windows;
- provides support for any languages at work;
- does not harm system files;
- instantly removes all watermarks on the display.
How to work with the utility:
Video: Removing Watermarks with Universal Watermark Disabler
In addition to the most common Universal Watermark Disabler utility, two small utilities are used for the same purposes:

How to remove the activation window and disable pop-up notifications
You can remove the activation window and turn off notifications in Windows 10 using the built-in Notifications and Actions service.
This service includes the following features:
- allows and prohibits the appearance of pop-up alerts for Windows 10 and third-party programs;
- allows you to show the system alerts about various events and updates received from the network;
- using pop-up menus, it speeds up the process of ejecting removable media, activating and deactivating various adapters.
Using this service, you can turn off annoying notifications, block them and turn off the notification center.
Disabling Notification Center
In Windows 10, you can turn off the notification center using three different methods:
- applying change Windows settings 10;
- through editing Windows Registry 10;
- change group policies systems.
Turn off notifications by changing the settings settings
This is the most fast way prevent unnecessary notifications from appearing on the display. It is carried out in several stages:

Video: Turn off notifications by changing Windows 10 settings
Disable Popup Notifications Using Registry Editor
This method is suitable for users who already feel confident enough working in the registry editor. Changes to be made to the registry and disabling alerts require the following algorithm:

Pop-up alerts are now disabled.
It should be taken into account that in the developed latest versions Windows versions 10, regardless of the desire of the user, the settings for turning off notifications in the registry may already be created. This can only be tracked clean install from a licensed distribution.
Turn off notifications when changing the general group policy
Video: Disable Notification Center and Toast Notifications
Removing watermarks and notifications in Windows 10 is a fairly easy process. At the same time, it is necessary to clearly understand that they were not developed by chance. It is quite possible that the activation failed for some reason or there was a failure in the system files. A watermark that was previously deleted as annoying will not appear. This can lead to the fact that at the most inopportune moment you will not be able to start the system and you will see a warning on the display about the end of the period allotted for activating Windows 10. You will need to spend time looking for a key, which, as always, will not be at hand. Therefore, you need to think carefully about whether it is worth removing watermarks and inscriptions about the need for activation.