Transferring your system to an SSD without reinstalling are the best ways. Transferring a system to an SSD without reinstalling - the best ways Hidden section samsung data migration
Using an SSD instead of a hard drive increases the speed and comfort of work, making information storage reliable.
The desire of users to change OC from hard drive to solid state drive.
How to correctly clone information with all partitions to a faster SSD drive without reinstalling OC?
How to transfer a system to an SSD
Read also: How to Transfer Windows to SSD - 6 Best Migration Software
There are several ways to transfer a system to an SSD. Let's consider each of them.
The first method is to transfer the user folder during installation.
To implement it, follow the instructions:
1 During the installation process, at the parameter selection stage (step # 10), instead of choosing to use the default parameters or customizing them, press CTRL + SHIFT + F3.
The computer will be restarted into the so-called "Audit Mode" , you will be logged into the built-in account "Administrator" .

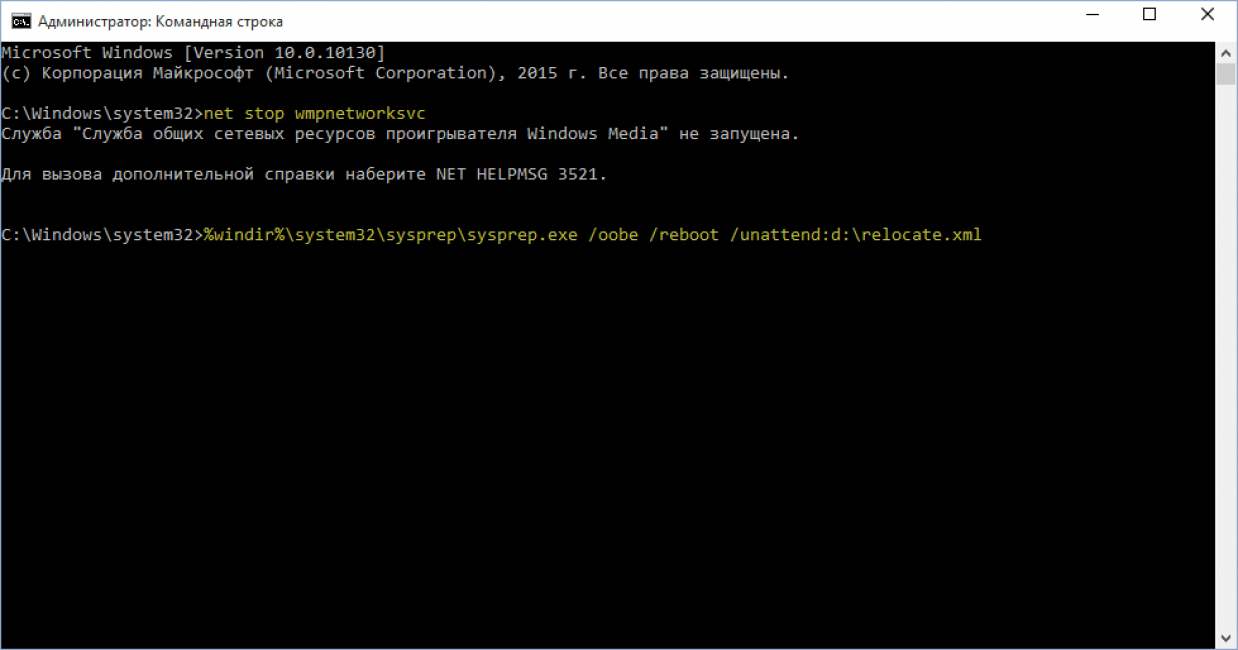
3 After completing the previous step, you need to simultaneously press the "Win" + "R" keys. A command prompt will open, where you need to enter "net stop wmpnetworksvc". After that enter re-enter in "% windir% \ system32 \ sysprep \ sysprep.exe / oobe / reboot /unattend:d:\relocate.xml"
5 After completing the previous step, the User folder will be transferred to the SSD of your choice.
- Create a response file using the instructions that were described in method number one.
- Run the system preparation tool in the same way as in method number one.
- Despite the fact that the system is already installed, when using this method, it will boot into audit mode and initial configuration of the system.You do not need to enter the product key if such a request appears, just click the button "Skip" .
You will not be able to sign in to a previously used account, so at the user sign-in stage, you will be prompted to create a local account.
New Account will be used to carry out the initial configuration after the transfer of the profile folder and subsequently it can be deleted.
Transfer OC from HDD to SSD
Read also: TOP 15 Programs for Windows Disk Defragmenter: Choosing the Best Utility
Before starting cloning, it is necessary that the size of the SSD must exceed the one from which we plan to clone.
AOMEI Partition Assistant Standart Edition
Read also: TOP 10 disk cloning programs: their advantages and disadvantages
First of all, we will analyze the stages of cloning OC with additional application which offers an easy way to copy OC.
We suggest using the AOMEI Partition Assistant for a sample. Russian-language application is freely available.
The functional program has a simple option to copy OC to any disk. Download and install the program on your computer.

- Find the section on the panel "Masters" located on the left, and select the line “ Transfer OC SSD or HDD ".

- A window opens with information about the transfer, we get acquainted with the message and select the tab ... We follow to the third step.

- We choose the place where we will copy the operating system. Particular attention must be paid to the fact that the drive must be unallocated, there were no partitions and, moreover, file systems otherwise you end up with a clean list. After selecting the target disk, select in the tab .

- The next step is to partition the drive where we transfer the OC. You can adjust it as needed, but remember that the size of the selected partition should not exceed the one on which the OC is located. Here it is possible to assign a designation to the created section, if necessary. When all the parameters are set, select the tab.

- Here, the program recommends that you finish installing the AOMEI Partition Assistant application to copy the OC to the SSD drive. It is suggested that you study the warning. After rebooting, the OC may not boot. In such a situation, be sure to disconnect the old drive or swap drives. Verify your actions by clicking the tab "End" .

- To start moving, press the button.

- A window will open with a list of pending operations, click the tab .

- An additional message follows: by clicking on the tab "Yes" , we confirm all our actions. When the reboot is complete, the process of migrating the OC to the solid-state drive will begin. The duration of the action depends on several reasons, these are the size of the cloned data, the speed of the drive and the capabilities of the computer.

At the end of the transfer of information to the computer, a reboot will occur again and you need to format the hard drive in order to remove the OC and the old bootloader.
- Works with all carriers
- Free of charge
- Average transfer speed
Windows standard tools
Read also: "NTLDR is missing" - what to do? Solving Windows Boot Problems
Another option is to copy the system to another drive using typical Windows tools.
This operation is possible only when the Windows program is installed at least 7. Otherwise, without additional programs not enough. Let's analyze the OC porting step by step using an example.
The operation of copying OC itself is not difficult by typical means - it is performed in 3 stages:
- Create OC image;
- Create boot disk;
- Unpack the OC image to another drive.
- To reproduce the OC image we use Windows program ... Open the menu "Start" , after "Control Panel" .

- Click on the line "Archiving computer data" and start creating. In the window "Back up or restore files" there are 2 necessary commands that we will use to create the OC image, and follow the desired link.

- We choose where we plan to write the OS image. There are two options: disk partition and DVD. It is worth recalling that Windows 7, even without additional programs, has a large volume. And when deciding to copy OC to DVD, multiple drives may be claimed.

- Select the place where the image will be stored, click on the tab. The program recommends to select sections for archiving. Since we do not copy anything except OC, we do not make a choice, the system itself marked everything required disks... Therefore, we press the tab.

- "Archive"
- We confirm the required archiving formats. Select the tab "Archive" and wait for the archiving to complete.

- After creating a copy of the OC Windows recommends making a bootable disk.

- Another way to create a disk using a string "Create a system repair disc" in the window Archive or Restore .

- Initially, the boot disk creation program recommends making the choice of the drive where you want to install blank disk for the record. Click and move on.
If your computer does not have recordable drives, you will not be able to write an OS image to the optical drive.

- If there is a disk with files, the system will ask for it. If the drive cannot be formatted, use a blank drive.

- To do this, open the window "My computer" and press right on the drive. We mark the line.
- Further actions to form a drive for copying the OS, on the selected drive, press the line and wait for the end of the action. When finished, a window will appear:

Let's summarize. The OS image has been created, as well as a bootable disk for transfer, we proceed to the final stage.

- We put the computer on reboot, at the end we go to the boot device selection menu.
This is usually done by pressing the F11 key, but there may be other ways.

- The environment for OS recovery is loaded. First, select the desired language (in our case, Russian), continue by clicking the tab "Next" ... After that, a search for installed systems will start.

- Once the OS image is done, then we move the switch to the second position and continue by pressing the tab.

- We choose "Recovering a computer using a previously created system image" and continue by clicking the tab .

- To set additional parameters as necessary, select the tab.

- At the final stage, we will see brief information about the created image. You can start unpacking, for this we click the tab ... We are waiting for the completion of the action.

- The system reboots on its own after unpacking is complete. The transfer of Windows to SSD is complete.
- No need to download.
- The transfer process is very complex
Transferring a system to an SSD is effective method organization of the computer. In addition, after purchasing a flash drive, you will not need to install an OS on it from scratch and configure all the drivers. Move to disk already the existing system will save time and free up the PC disk for storing other files.
Along with the transfer of Windows to the SSD, absolutely all programs, games, settings and drivers that are already installed on the PC will be moved. You can solve the problem in one of two ways:
- Using built-in OS functions;
- Using third party utilities.
Note, the transfer methods may vary depending on the version of Windows and the settings of the purchased flash drive.
What data can be transferred toSSD
Storage operating system on an SSD allows not only to speed up its work, but also increases the response of other programs and files that are stored on the disk. The user can move the following types of data to a flash drive:
- Operating system ... It is added to the SSD with all ready-made drivers and settings. In fact, a duplicate of it is created, which was previously stored on the HDD;
- Programs - choose yourself which applications you want to add to the SSD, and which you want to leave on the computer's hard disk drive (HDD). We advise you to leave voluminous programs for video editing and software development / testing on your computer - this way they will work many times faster;
- User files ... It can be any of your documents, photos, music, videos and other types of data.
Components to move
To add a Windows used to an SSD, the following objects are required:
- Installed transfer utility;
- The SSD itself;
- Computer or laptop;
- An adapter of the SATA-USB type, with which an external drive is connected to a PC.
If you only work with OS resources, you do not need to install third party utility.
Computer Requirements
Before performing any OS porting steps, make sure your device meets all of the minimum requirements which allow the utility to interact with the SSD and transfer large amounts of data. The minimum requirements are shown in the following table:
You can compare the settings of your computer with the above specifications using the About System window. It displays the correct data about the main hardware and software components of the device:
Fig. 2 - viewing window Windows settings and computer
We use the built-in capabilities of Windows
Follow the instructions to transfer the operating system to the flash device:
- Open the Disk Management window. To do this, in the run window, write the command diskmgmt.msc and confirm the action;
Figure 3 - Launching Disk Management
- Now we need to reduce the amount of OS on the disk. You can perform the action using the "Shrink Volume" function. All data will remain in the same state, only the occupied space on the HDD will decrease. Right-click on the "System" section, and then on "Shrink Volume";
Fig. 4 - Compressing the volume
- After successfully reducing the OS size, a free partition will appear in the disk layout. This means that everything was done correctly;
- Connect the drive to your computer and restart the "Disk Management" window;
- Now click on the "Master" tab and select "Transfer OS SSD" from the list;
Fig.5 - "Master" tab
- Will open standard utility for cloning an operating system. Click on the "Next" button to go to the settings;
- Click on the "Unallocated space" item and go to the next window;
Fig. 6 - Selecting disk space
- Now you can independently change the size of the future disk or leave all the parameters unchanged;
Fig. 7 - resizing a disk partition
- After clicking on the "Next" button, the wizard will start moving the system. After completing the action, you can turn off the computer and, at the next boot, select the OS that is on the SSD.
Windows will also remain on the hard disk. You can delete it or use it as backup when the system needs to be restored.
Fig. 8 - the result of a successful move of Windows
Do not forget to click on the "Apply" button in the upper left part of the "Disk Management" window, otherwise all changes made will not be saved. If during the transfer there were windows with errors or freezes, you should reset the settings, restart the PC and try to transfer again.
Figure 9 - Applying Changes
Instructions forSSD fromSamsung
Samsung has released an official utility that allows you to quickly move the OS from hard disk on the purchased flash drive. The utility is called Samsung Data Migration. You can download it free of charge from the official website of the company (section "Memory" - "SSD") or using the disk that is included in the device package.
The initial window of the program looks like this:
Fig. 10 - window Samsung Utilities Data Migration
Immediately after starting the utility, connect the SSD to the computer using the appropriate adapter. Click on the "Start" button. Next, the application will automatically scan the used HDD and display information about the remaining free space and media sections.
Fig. 11 - Analysis of a disk with installed copy Windows
After the analysis, the program will automatically detect the SSD connected to the computer and show it on the screen:
Fig. 12 - Reconciliation of the source and destination disk
If the space that Windows occupies on the HDD does not exceed the available space on the SSD, you can immediately proceed with the transfer by clicking on the "Start" button. All components will automatically move. The procedure can take from 30 minutes to 1.5 hours, depending on the version of Windows you are using.
Figure 13 - Successful System Migration
As a result, you will receive a notification about the successful cloning of the operating system to the flash drive. Close the window and delete all Windows data from the HDD.
The advantage of using Samsung Data Migration is simple interface... The program will do all the work for you and minimize the likelihood of errors or bugs after the OS transfer.
What if, during the analysis phase, you find that there is not enough space for the OS on the SSD? In this case, you need to clean Windows from unused data and applications. This can be done directly in the Samsung Data Migration utility window.
Fig. 14 - Error. Insufficient space on SSD
After the error text appears (highlighted in red), click on the "Next" button and in a new window delete all library files that litter the system. Clean the OS until the text "Ready to clone to SSD" appears in the main utility window.
Fig. 15 - Successful cleaning of unnecessary files
Acronis True Image Utility
Fig. 16 - the main window of the Acroins application
To move the system, connect the removable media to the computer and in the program window, click on the "Clone disk" - "Copy partitions" tile. In the window that opens, select auto mode moving. It is suitable for all tasks and quickly copies data.
Fig. 17 - selection of clone mode
All partitions will be copied to the flash drive. All data that was on the SSD before cloning will be deleted. The disk itself will become bootable and can only be used to run the operating systems installed on it.
Fig. 18 - copying process
Seagate DiscWizard Utility
The utility completely repeats the Acronis interface. It must be used if your PC has at least one HDD from the manufacturer Seagate. For cloning, you should follow the same steps that were described in the previous paragraph of the article.
Figure 19 - Seagate Disc Wizard main window
Changing the bootloader configuration
After cloning the system, a copy of the OS will remain on the computer, and at each boot a window with a choice of boot will appear. After the transfer, we advise you to perform a number of actions:
- Without deleting the original copy from the HDD, test the operation of Windows on the HDD. There are times when the system starts to slow down and performance degrades. This is extremely rare and depends solely on the SSD you choose. Until the first copy is deleted, you will always have the opportunity to return to using it and remove the OS from the SSD;
- Change the system bootloader settings.
The boot manager is a built-in component that helps your computer determine which installed OS to start. Also, you can customize the startup order of hardware components.
Immediately after cloning, the manager will show two systems with identical names - the original and the copied one. In the case of a normal Windows work on the SSD, you need to delete the version that remains on the computer's hard drive. Follow the instructions:
- Reboot your PC and start the version that was moved to the flash drive;
- Open up command line Windows;
- Enter the command shown in the picture below, giving the OS copies on the SSD a unique name;
Migrating your system to an SSD is an efficient way to organize your computer.
Content:Note, the transfer methods may vary depending on the version of Windows and the settings of the purchased flash drive.
What data can be transferred to an SSD
Storing the operating system on an SSD allows not only to speed up its operation, but also increases the response of other programs and files that are stored on the disk.
The user can move the following types of data to a flash drive:
- Operating system ... It is added to the SSD with all ready-made drivers and settings. In fact, a duplicate of it is created, which was previously stored on the HDD;
- Programs - choose yourself which applications you want to add to, and which you want to leave on (HDD). We advise you to leave voluminous programs for video editing and software development / testing on your computer - this way they will work many times faster;
- User files ... It can be any of your documents, photos, music, videos and other types of data.
Components to move
To add a Windows used to an SSD, the following objects are required:
If you only work with OS resources, you do not need to install a third-party utility to transfer.
Computer Requirements
Before performing any OS transfer steps, make sure that your device meets all the minimum requirements that allow the utility to interact with an SSD and transfer large amounts of data.
The minimum requirements are shown in the following table:
| Parameter name: | Minimum value: |
|---|---|
| OS | · Windows XP (only 32x); · Windows Vista(all bits); Windows 7 (all bit sizes); Windows 8 \ 8.1 (all bit sizes); Windows 10 (all bit sizes). |
| RAM | At least 1GB |
| Types of discs that you transfer | GPT or MBR |
| Copied sections | Standard. Non-portable RAID arrays |
You can compare the settings of your computer with the above specifications using the About System window.
It displays the correct data about the main hardware and software components of the device:
We use the built-in capabilities of Windows
Follow the instructions to transfer the operating system to the flash device:
- Open the window "Disk Management"... To do this, in the run window, write the command diskmgmt.msc and confirm the action;

Figure 3 - Launching Disk Management
- Now we need to reduce the amount of OS on the disk. You can perform the action using the "Shrink Volume" function. All data will remain in the same state, only the occupied space on the HDD will decrease. Right-click on the "System" section, and then on "Shrink Volume";

Fig. 4 - Compressing the volume
- After successfully reducing the OS size, a free partition will appear in the disk layout. This means that everything was done correctly;
- Connect the drive to your computer and restart the window "Disk Management";
- Now click on the "Master" tab and select "Transfer OS SSD" from the list;

Fig.5 - "Master" tab
- The standard utility for. Click on the "Next" button to go to the settings;
- Click on item "Unoccupied space" and go to the next window;

Fig. 6 - Selecting disk space
- Now you can independently change the size of the future disk or leave all the parameters unchanged;

Fig. 7 - resizing a disk partition
- After clicking on the "Next" button, the wizard will start moving the system. After completing the action, you can turn off the computer and, at the next boot, select the OS that is on the SSD.
Windows will also remain on the hard disk. You can delete it or use it as a backup when you need to restore the system.

Fig. 8 - the result of a successful move of Windows
Do not forget to click on the "Apply" button in the upper left part of the window "Disk Management" otherwise, all changes made will not be saved.
If during the transfer there were windows with errors or freezes, you should reset the settings, restart the PC and try to transfer again.

Figure 9 - Applying Changes
Samsung SSD manual
The company has released an official utility that allows you to quickly move the OS from your hard drive to a purchased flash drive.
The utility is called Samsung Data Migration. You can download it free of charge from the official website of the company (section "Memory" - "SSD") or using the disk that is included in the device package.
The initial window of the program looks like this:

Figure 10 - Samsung Data Migration Utility Window
Immediately after starting the utility, connect the SSD to the computer using the appropriate adapter. Click on the "Start" button.

Fig. 11 - Analysis of a disk with an installed copy of Windows
After the analysis, the program will automatically detect the SSD connected to the computer and show it on the screen:

Fig. 12 - Reconciliation of the source and destination disk
If the space that Windows takes on the HDD does not exceed the available space on the SSD, you can start transferring immediately by clicking on the "Start" button.
All components will automatically move. The procedure can take from 30 minutes to 1.5 hours, depending on the version of Windows you are using.

Figure 13 - Successful System Migration
As a result, you will receive a success notification. Close the window and delete all Windows data from the HDD.
The advantage of using Samsung Data Migration is its simple interface. The program will do all the work for you and minimize the likelihood of errors or bugs after the OS transfer.
What if, during the analysis phase, you find that there is not enough space for the OS on the SSD? In this case, you need to clean Windows from unused data and applications.
This can be done directly in the Samsung Data Migration utility window.

Fig. 14 - Error. Insufficient space on SSD
After the error text appears (highlighted in red), click on the "Next" button and in a new window delete all library files that litter the system.
Clean the OS until the text appears in the main utility window Ready to Clone to SSD.

Fig. 15 - Successful cleaning of unnecessary files
Acronis True Image Utility
Acroins is the most popular utility for transferring OS to removable media. It recognizes all brands of SSD. The app is supported by all Windows versions so there won't be any compatibility issues.
Remember, you can use the application only if the hardware of your PC has a disk from the manufacturer Acronis.
If the component is missing, the utility will not start, and the user will be notified about the impossibility of working with the program.

Fig. 16 - the main window of the Acroins application
To move the system, connect the removable media to the computer and in the program window, click on the tile "Cloning a disk"-"Copying Sections".
In the window that opens, select the automatic mode of movement. It is suitable for all tasks and quickly copies data.

Fig. 17 - selection of clone mode
All sections will be copied to. All data that was on the SSD before cloning will be deleted.
The disk itself will become bootable and can only be used to run the operating systems installed on it.

Fig. 18 - copying process
Seagate DiscWizard Utility
The utility completely repeats the Acronis interface. It should be used if your PC has at least one hard drive from the manufacturer Seagate.
For cloning, you should follow the same steps that were described in the previous paragraph of the article.

Figure 19 - Seagate Disc Wizard main window
Changing the bootloader configuration
After cloning the system, a copy of the OS will remain on the computer, and at each boot a window with a choice of boot will appear. After the transfer, we advise you to perform a number of actions:
- Without deleting the original copy from the HDD, test the operation of Windows on the HDD. There are times when the system starts to slow down and performance degrades. This is extremely rare and depends solely on the SSD you choose. Until the first copy is deleted, you will always have the opportunity to return to using it and remove the OS from the SSD;
- Change the system bootloader settings.
The boot manager is a built-in component that helps your computer determine which installed OS to start. Also, you can customize the startup order of hardware components.
Immediately after, the dispatcher will show two systems with identical names - the original and the copied one.
In case of normal operation of Windows on the SSD, you need to delete the version that remained on the hard disk of the computer. Follow the instructions:
- Reboot your PC and start the version that was moved to the flash drive;
- Open;
- Enter the command shown in the picture below, giving the OS copies on the SSD a unique name;

Fig. 20 - the command for renaming the loader component
- Now configure the dispatcher so that it always starts the new OS first. This can be done using the following command:

Fig. 21 - automatic start cloned OS
- To remove the old system, enter the following command (where ID is the number of the old OS copy in the bootloader list):

Fig. 22 - deleting the original copy of Windows
Outcome
As you can see, to transfer the system to a removable flash drive, you just need to use the universal utility for duplicating components or perform the transfer yourself.
Remember to delete boot record disk that is no longer in use. If this is not done, errors may occur when turning on the OS.
Users who have migrated the system to an SSD note an increase in computer performance and faster execution of complex tasks and processes.
The operating system loading speed increases 2-3 times.
Thematic videos:
How to connect an SSD to a desktop computer. Transfer Windows from HDD to SSD
Correct connection of the SSD to the personal desktop computer. How to quickly transfer Windows from a hard disk drive (HDD) to a solid state drive (SSD). Practical advice, performance evaluation after replacing with an SSD.
Laptop Hard Drive HDD SSD Transfer System Free
Laptop hard HDD disk SSD transfer systems + system cloning program