Nvidia Control Panel won't open: how to fix it? How to open the NVIDIA Control Panel Failed to apply the selected settings to the system
Sometimes when trying to access display settings on computers with NVIDIA graphics cards installed, the user may receive a message stating that NVIDIA display settings are unavailable. To change at least something does not work at all. What to do in such a situation, read the material below.
NVIDIA Control Panel: NVIDIA display settings are not available. What is the reason?
Most experts call the problem with the video card drivers the reason for this situation. It is not surprising, because it is this control software that provides communication graphics adapter with computer monitor or laptop screen.
But why NVIDIA display settings are not available on a case-by-case basis is sometimes difficult to determine, despite the known root cause. Drivers may be out of date, missing, or even damaged. Depending on this, you can apply several effective solutions to help fix the problem. The methods are quite simple, but in some cases it is necessary to take into account the specifics of the situation.
What if NVIDIA display settings are not available?
Let's start with the simplest. If such a message at one "perfect" moment appeared at the start of the system, but everything worked before, perhaps it is somehow connected with failures in the OS itself. There is nothing easier than activating System Restore to the point where the problem did not exist.
The same goes for the situation where you get a notification that NVIDIA display settings are not available in Windows 10 or any other OS version after installing updates. It is possible that some of them were installed incorrectly or themselves cause malfunctions. operating system... In this case, in the section of programs and components, you need to remove the recently installed updates, sorting them by installation date. But you need to delete them one at a time, rebooting the system and trying to access the settings. When a failed update is found, you should set up a manual search, and then exclude the bad package from the list, having previously memorized or written down its number.

Another completely banal reason is associated with situations when two video cards (discrete and integrated) are installed on the computer. You can fix the situation in the "Task Manager", where the built-in adapter is disabled if it is used in this moment, or the NVIDIA card is activated.
Exactly the same actions for cases when the settings of the "Device Manager" did not have an effect, you can perform in BIOS settings, where from the list installed video cards use is chosen as the main NVIDIA.
Reinstalling and updating drivers
But, suppose that all the above methods did not work, and the system again displays a message that the NVIDIA display settings are not available. In such a situation, manual user intervention will be required.

In order not to go far, try to update the adapter drivers in the same "Device Manager". If that doesn't work, uninstall the drivers or even the graphics card itself. It is possible that the drivers will be installed automatically upon reboot. As a last resort, you can use installation disk with adapter drivers, if available. But the biggest problem is that the drivers are not always uninstalled this way, and the message stating that NVIDIA display settings are unavailable appears over and over again.
Removing old drivers
In this case, you will need to independently remove all drivers and related software, using the section of programs and components located in the "Control Panel".

Also for complete cleaning system from unnecessary drivers, you can use the Display Driver Uninstaller utility (but it is intended only for drivers and does not remove additional programs).
After that, you should reboot the system and reinstall all components. To install the latest drivers, it is best to use automated utilities like Driver booster that will update the control software for absolutely all devices on the computer.
Specialized drivers
Another option to fix the issue of NVIDIA display settings unavailable concerns non-standard laptop models.

First, open the Run menu and enter the msinfo32 command, then find the exact name of the laptop model. Then contact the manufacturer's official resource, search for drivers by model name and download the appropriate driver, and then install it yourself.
Note: if the installer is in the form of an EXE file, use the usual run as administrator. If this INF file, through RMB select the line "Install". If the system reports that the driver cannot be installed this way, go to Device Manager, select the driver update and specify the path to the saved INF file.
Some manufacturers offer users an online laptop scan, after which they will receive a list of problems, as well as tips for their elimination. And the graphics adapter driver can be installed directly from the manufacturer's website instead of downloading.
Afterword
That is all there is to say about fixing the above problem. Which product should you use? The question is rhetorical. In principle, an automated driver update program can be installed immediately. If the problem is not with the drivers, but with additional software, you will have to get rid of it, and then reinstall it by downloading latest version from the NVIDIA website. However, those who have the skills to work with drivers can perform all the steps in manual mode.
The manual describes the process of managing settings in detail. NVIDIA graphics cards... We'll also show you how to adjust NVIDIA 3D settings for some games. Before making the settings, you need to install the drivers for Nvidia.
If the drivers are installed, we proceed with the configuration.
Clicking on the desktop right click mouse to display a pop-up menu. In which we select the item:
After that we get to the control panel. Go to the section: 3D options
In the window that appears, first select the item: Adjusting playback picture settings
Click: Apply(as shown in the picture below)

Now the fun begins.
Configuring 3D NVIDIA Settings for Games
Go to the section: Controlling 3D parameters
 After that, we proceed to setting the parameters in the right window.
For the applications to work correctly, you must set the following parameters:
- CUDA - GPUs: Everything
- Anisotropic filtering: Turn off
- V-Sync (vertical sync): Turn off
- Vertical sync pulse": Use 3D app setting
- Shading background lighting ": Turn off
- Maximum number of pre-trained personnel: select the item marked with the NVIDIA icon
- Stream optimization: Automatically
- Power management mode: Adaptive
- Anti-aliasing - gamma correction: Turn off
- Anti-aliasing - options: Turn off
- Anti-aliasing - transparency: Turn off
- Anti-aliasing - mode: Turn off
- Triple buffering: Turn off
- Acceleration of multiple displays / mixed GPUs: Multi-display performance mode
- Texture filtering - anisotropic sampling optimization: Turn off
- Texture filtering - quality ": Highest performance
- Texture filtering - negative UD deviation: We include
- Texture filtering - trilinear optimization ": We include
- Anisotropic filtering. Directly affects the quality of textures in games. Therefore it is recommended switch off.
- Include scalable textures: Turn off
- Extension limitation: Turn off
After changing all the settings, click the apply button. These settings do not guarantee 100% of the result, but in 90% of cases they can increase the FPS up to 30%.
Which cannot be changed with Windows settings... In particular, it can be used to change the resolution, adjust the brightness and saturation of the image, rotate the screen, adjust 3D graphics and much more. In this article we will tell you how to open the Panel NVIDIA control and what to do if it does not open.
Method number 1. Context menu on the desktop.
The easiest way to open the NVIDIA Control Panel is to use the context menu on the desktop. To do this, you just need to right-click on free space on the desktop and in the menu that appears, select "NVIDIA Control Panel".
Method number 2. Control panel.
If you cannot open the NVIDIA Control Panel with context menu on your desktop, you can use alternative way... To do this (in Windows 10 it is convenient to use the Windows key + X key combination) and then go to the "Hardware and Sound" section.
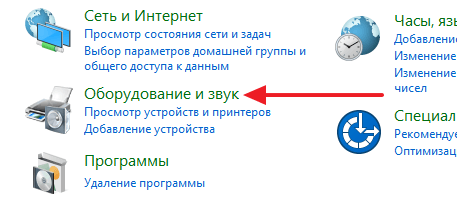
After that, you need to scroll down the window and click on the "NVIDIA Control Panel" there.

NVIDIA Control Panel won't open?
Sometimes users are faced with the fact that the "NVIDIA Control Panel" does not open on their computer. This usually signals a problem with the drivers. In such a case, it is best to completely and reinstall them.
To completely remove NVIDIA drivers from your computer, download and install Display Driver Uninstaller. After that, restart your computer and run this program... After that, open the drop-down menu and select "NVIDIA" there. Thus, you tell the Display Driver Uninstaller program that you want to remove the drivers from the NVIDIA video card.

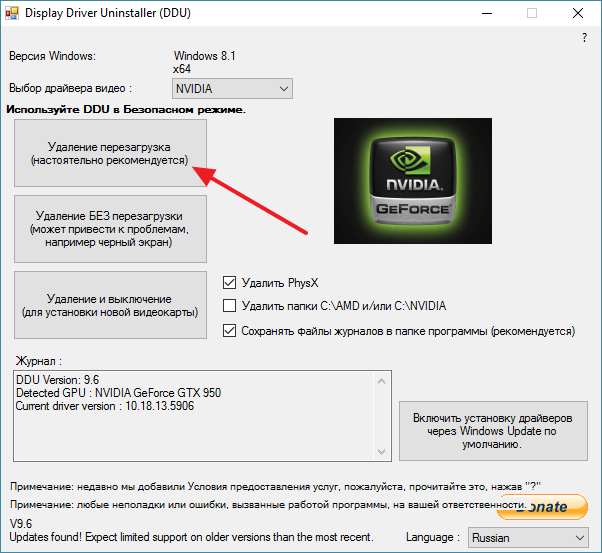
After rebooting, go to normal mode Windows work, install new drivers and restart the computer again. In most cases, this procedure will be enough for the NVIDIA Control Panel to start opening normally.
A huge variety of owners graphics cards from NVIDIA suffer from the same misfortune - the inability to open the Nvidia Control Panel. This problem was seen on all versions of the operating room Windows systems from Windows 7 to Windows 10. All attempts to open the Nvidia Control Panel from the Start menu have proven to be completely useless.
In this article, we will take you through the problem of inability to open the Nvidia Control Panel. We will try to update and reinstall latest drivers for the video card from the official site. We'll also try to figure out the NVIDIA Display Driver service, update the .NET Framework libraries, restart the Nvidia Control Panel process, and more.
First of all, you should try reinstalling Nvidia drivers... To do this, do the following:
- Click on Windows + R and write devmgmt.msc.
- With Device Manager open, locate the Display Adapters drop-down tab and open it.
- Right click on your graphics accelerator and select "Uninstall." Confirm your intentions by checking the box next to "Remove driver programs for this device" and clicking OK.
- Then go to the official Nvidia website to download the drivers you need for your video card.
The note: We do not recommend that you choose automatic search drivers, as this sometimes leads to various failures, and it can also take a huge amount of time. It will be better if you use manual selection drivers. - After downloading a bunch of drivers from Nvidia's website, run the installer to begin the driver installation process. We have already removed the drivers for the video card through the Device Manager, but it will still be better if you check the box next to the "Clean install" option during installation.
- After installing the new drivers, restart your computer and then try accessing the Nvidia Control Panel again.
The note: An alternative installation of drivers can be the Device Manager, with the help of the functionality of which this can also be done. However, under certain circumstances, various problems... Nevertheless, if you want to install the drivers in this way, then do the following:- Click on Windows + R and write devmgmt.msc.
- With Device Manager open, locate the Display Adapters drop-down tab and open it.
- Right-click on your video card and select "Update driver ...", after which the Device Manager will install everything itself.
Method # 2 Configuring NVIDIA Display Driver Service
The NVIDIA Display Driver service is responsible for running the Nvidia Control Panel. Accordingly, if this software stops responding, then restarting the service that depends on it is a perfectly reasonable solution.
- Click on Windows + R, write services.msc and press Enter.
- Find a service named "NVIDIA Display Driver Service" in the list.
- Click on it twice to go to its Properties.
- Find the Startup Type drop-down menu and click on it.
- Select the "Automatic" option.
- Then make sure the service is running. If not, then click on the "Run" button.
- Repeat the same steps for all Nvidia services that will run on your computer.
- After completing these steps, try launching the Nvidia Control Panel again.
The note: even if it says the Nvidia services are running, it's better if you restart them manually. To do this, click “Stop → Start” and do this with each Nvidia service.
Method # 3 Restarting the Nvidia Control Panel process
This method is quite similar to the previous one. When launching Nvidia Control Panel, its process may malfunction. In this case, you just need to restart the process.
- Press the key combination Ctrl + Shift + Esc to bring up the Task Manager.
- Go to the tab with open processes.
- Find a process called nviplui.exe, right-click on it and select "End Process".
- Also try closing other Nvidia related processes.
- Now that all processes have been closed, try opening the Nvidia Control Panel again.
If it was a malfunctioning process, then a simple restart like this would help fix the situation.
Method # 4 Setting a higher resolution
Some users on the network were able to overcome the problem with the non-launching Nvidia Control Panel with a rather strange solution - setting more high resolution... Again, some users claim that it may not launch due to the low resolution.
- Right-click on the Desktop and select "Screen Resolution".
- Click the "Resolution" drop-down menu and select the highest possible resolution for your monitor.
- Apply the permission changes.
With the resolution higher, try launching the Nvidia Control Panel. If it starts, then the problem should be resolved and you can set your standard resolution.
Method # 5 Fixing the Windows Registry
If you still could not solve the problem when starting the Nvidia Control Panel, then now we will try to fix the entries in Windows Registry... As always, be careful when modifying entries. We recommend that you create backup your Windows Registry so that you can quickly recover in the event of something unexpected.
- Click on Windows + R, write regedit and press Enter.
- Walk through HKEY_CLASSES_ROOT \ Directory \ Background \ ContextMenuHandler.
- Find NvCplDesktopContext, right-click on it and select "Delete".
- Now go to HKEY_CLASSES_ROOT \ Directory \ Background \ shell.
- Right click on Shell and select "New → Section" and name it Nvidia Control Panel.
- Right click on Nvidia Control Panel and select "New → Section". Name this section command.
- Double click on command and write the value in the line C: \ Windows \ System32 \ nvcplui.exe, and then click OK.
- Exit the Windows Registry and restart your computer.
After making small changes to your Windows Registry, try opening the Nvidia Control Panel again. It should definitely open up quietly this time.
Method # 6 Update .NET Framework and VC ++ Redistributable
NVIDIA applications, as expected, run on such software like .NET Framework and VC ++ Redistributable. If you have installed on your computer outdated versions of these libraries, the inability to open the Nvidia Control Panel can be an expected problem.
Try updating the .NET Framework and VC ++ Redistributable by downloading from the downloads section of the Microsoft official website. In addition, you can also check if you have any pending updates for the operating system. Try to install them, if any.
Method # 7 Disable Quick Boot
UEFI based firmware has the function quick launch which helps your computer start up faster. However, this function has one drawback - because of it, some third party application, drivers and services simply cannot start simultaneously with the system, i.e. their launch is skipped.
If you have enabled this function and you cannot start the Nvidia Control Panel, then the above event may have occurred. You need to go to your BIOS settings and disable Quick Boot or Quick Startup.
Found a typo? Select the text and press Ctrl + Enter