Step-by-step instructions for working with the picpick program. PicPick - quick screenshot creation. Saving in various formats
An excellent screenshot tool that allows you to take a screenshot of the screen or any area of it in one click, including scrolling windows.
ATTENTION! The description below is relevant for more early version programs 3.3.1.
Signs of a good screenshot software
A good screenshot program, in my opinion, should have the following features:
- removal of both the entire screen and its parts (active windows, selected areas, window elements, arbitrary selection);
- the presence of a built-in graphic editor with the ability to overlay explanatory elements (leaders, arrows, highlighting, etc.);
- simultaneous support for "hot" keys and interface buttons for capturing the screen in one mode or another;
- the ability to send a screenshot directly to the specified email or social network;
- saving in several graphic formats.
Even not all paid programs can satisfy the listed requirements. “What can we say about the numerous free ones,” you might say.
However, I have a serious objection to this in the form of an excellent program, which I have been using for over a year. It's about PicPick.
Comparison with paid analogue
This program meets all of the above requirements and even more - it has a number of very useful add-ons that can come in handy!
I'll tell you a secret that before I encountered PicPick, I worked with the famous paid program SnagIt, that's why I want to compare it with her.
As you can see, there are not so many differences between our two programs, if you do not take into account the fact that PicPick does not know how to capture video. As for the rest, our free screenshot shooter is even slightly ahead of SnagIt in terms of functionality.
Judge for yourself - in addition to capturing images from the screen in various modes, PicPick has the following tools:
- capture the color under the cursor;
- color palette for the selection of the desired shades;
- zoom window, with the ability to zoom in 10 times any area of the screen;
- ruler for measuring any distances on the screen;
- crosshair for measuring the linear dimensions of rectangular areas;
- goniometer;
- blackboard so that you can write and draw directly on the screen!
And it's all in one program!
Installing PicPick
PicPick does not have a portable version, so before taking a screenshot of the screen, you will have to install our program.
To do this, we need to download the archive with installation file, which you need to run. In the opened window press the button Next, then I Agree and stop at the next screen.
Here we are offered to install a browser add-on along with the program. Naturally, hardly anyone needs it, so before clicking "Next", uncheck all three checkboxes. Next, we finish the installation as usual.
Initial program settings
Once the installation is complete, PicPick will automatically launch the main window and open the Preferences window on top of it.
![]()
Before moving on to working directly with our application, let's go through all the settings, which are located in several tabs.
In the "About the program" tab (which opens by default) you can configure the interface language, as well as activate the creation of a shortcut on the desktop, autorun and check for program updates.
Let's go to the "Capture" tab.

Here we can configure where the captured screenshot will be sent (by default - to the built-in editor), some capture parameters and the display of the zoom window when capturing.
Name mask- template for future names of saved screenshots.In the "File name" tab, you can set a name mask for saving your captures, as well as set the default format of the resulting image.
In the "Editor" tab, you will find a number of options that will allow you to make additional settings in the work of the built-in graphic editor PicPick.
The next tab ("Images") allows you to set the quality of the resulting screenshots.
Accordingly, the "FTP" tab contains all the settings that relate to the transfer of images to FTP servers.
Last tab, which we will consider - "Keys".

With its help, you can set keyboard shortcuts by which you can call any PicPick function.
How to take a screenshot using PicPick
Now that we have dealt with all the settings, it's time to start directly creating screenshots. If we close the settings window, we will find the main PicPick window under it.

If you are accustomed to using various keyboard shortcuts, you can easily disable the display of this window by ticking the box "Do not display this window when starting the program" in the lower left corner. If you are not used to the "hot keys", then you can safely use this window for your own purposes :).
All functions in the main PicPick window are sorted into two columns: the left contains actions related to images and their capture, and the right contains additional graphic tools.
To activate any task or tool, just press the corresponding button.
By the way, if you have hidden the main window, then you can access all the program control buttons through the PicPick context menu in the tray.

As soon as you decide on the desired capture option, you should press the corresponding button (or "hot" keys on the keyboard), after which, in certain modes, a frame may appear to define the area of the image.
If for some reason you change your mind about taking a screenshot, in this mode, just click the RIGHT mouse button. Otherwise, the resulting image will immediately open in the built-in graphics editor.

We can apply a number of effects to the resulting image, add arrows and callouts of various shapes with explanatory text, as well as draw arbitrary shapes, add any text and overlay any parts of images from the clipboard.
Unfortunately, graphics editor PicPick doesn't know how to work with layers, but you can still combine two pictures in it :). To do this, as I said, you need to copy the desired fragment to the clipboard in advance, and then simply paste it anywhere in the new screenshot.

From the same menu, you can send the resulting screenshot for printing, post it on the Internet, or open it in another program, for example, for additional processing!
Additional PicPick Tools
Now you shouldn't have any problems with capturing images and subsequent processing of screenshots, so for a complete acquaintance with the program, I propose to study its additional functions.
In the main PicPick window, they are called "Graphic tools" and are collected in the right column. And the first one is "Color under cursor".

With it, as the name suggests, we can capture any color on our monitor! When this tool is activated, the mouse cursor takes the shape of an eyedropper and a magnification window appears, which we can use to more accurately determine the desired shade on the screen.
RGB(from the English. Red, Green, Blue- red, green, blue) - color model built on these three primary colors.Please note that under the magnification window, the code of the current color is determined in real time in the format specified in the settings (by default HTML - RGB).
After clicking on the desired color, a window of the second tool - "Color palette" will open in front of you.
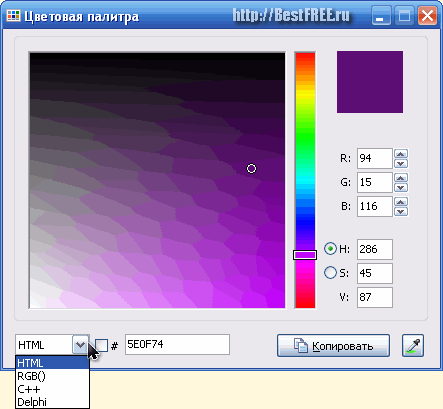
Here we already see the full spectrum of colors with all sorts of shades, any of which can be selected and copied, for example, into the code of your program or into the palette of a graphic editor. And here you can already change the display modes of colors, and their encoding!
If you do not need the ability to capture color, but simply want to get a closer look at any small details on the monitor screen, then the Zoom Window tool may come in handy.

It allows you to quickly enlarge the desired area under the mouse cursor up to 10x, which is one order of magnitude larger than the built-in Magnifier in Windows.
The following three tools can be very useful for web developers, as they help to make various linear measurements of any object on the screen. And the first function here is "Ruler".

It allows you to measure the width and height of any elements displayed on the monitor. It is as easy to measure with it as with a regular ruler - it is enough to set the beginning of the floating window "Rulers" to the beginning of the measured object, and then move the cursor to the opposite edge of the element of interest.
The number we are looking for will be displayed in the magnification window. For example, in the screenshot above, we found out that the width of the "+1" button in google search engine is equal to the 31st pixel :).
You can customize the ruler using context menu, which allows you to position the tool vertically or horizontally, change units of measurement (pixels by default), transparency and its color.
The next tool is the "Protractor".

It is even easier to use than Ruler. The result is achieved in three clicks:
- First, we fix the point at which the measured angle is located.
- The second is to fix the first adjacent vector that forms the angle.
- The third - we indicate the second segment, after which we get the value of the angle in degrees with an accuracy of minutes!
The last measuring tool is the Crosshair.

This tool is similar in functionality to the "Ruler", but, unlike it, it allows you to simultaneously measure the width and height of any object on the screen, though only in pixels.
To start the measurement, you need to click the left mouse button at the "zero" point of measurement, and then adjust the end point using the appeared crosshair and the magnification window. The width and height dimensions in pixels will be displayed under the crosshair.
The last additional PicPick tool is Slate Board.

With its help, we have the opportunity to draw directly on the screen. Such a function can be useful for people who often give presentations or record video tutorials, since it allows the viewer to focus on specific objects.
When you activate the Slate Board, a small toolbar appears on the screen, where you can access:
- Move - a tool for navigating the enlarged space of the "board";
- Increase - no comments :);
- Pencil - allows you to draw freehand lines;
- Arrow - draws arrows according to the template you have selected;
- Shape - lets you draw rectangles, rounded rectangles, and ellipses.
In addition to all of the above, the panel has a slider for controlling the transparency of the drawn parts, buttons for clearing and capturing the screen, as well as a scale for the size of the drawn elements and a palette of colors.
To exit the slate board mode, just as in all previous cases, click with the RIGHT MOUSE KEY on the free space or click the "Close" button on the toolbar.
Advantages and disadvantages of the program
- full set of screen capture capabilities;
- support for customizable "hot" keys;
- built-in additional tools;
- availability of functions for quickly sending the received screenshots to the Internet;
- good built-in graphics editor.
- the program is "for non-commercial use only", although ... :);
- no video capture function;
- restrictions when enlarging screenshots in a graphics editor (up to 1000%);
- there is no function to adjust the color tolerance when using a fill.
conclusions
In fact, PicPick is no worse paid analogs like the same SnagIt or "snickering" FastStone Screen Capture :). And with developer-friendly tools, it might even be better!
In any case, with the help of this program you can not only make a screenshot of the screen of any degree of complexity, but also professionally process it. Naturally, like any other application, PicPick is not devoid of some flaws and shortcomings.
However, given the fact frequent updates, we can confidently say that the number of shortcomings will decrease from release to release. Or maybe new functions will appear (for example, video capture) ... Then there will be beauty in general :)
Afterword
Often, working at a computer, we perform certain actions "automatically", taking them for granted. However, to the uninitiated, they may not be so obvious.
If you want to teach something new to your colleague or friend who are next to you, then the easiest way is to turn on the computer and directly show how this and that is done.
However, what if your "student" is far from you, and the usual telephone consultation does not bring the desired effect? There are two options for solving the problem.
Often users ask themselves how the screen contents can be saved to a file. For most, the PrintScreen key and the built-in graphic Paint editor to paste the copied screenshot and save it to a file. However, this is not always enough. There are situations when you need to capture not the entire screen, but only part of it, some area, window or toolbar. This is where screen capture utilities come to the rescue. The most famous is probably SnagIt. But in recent times this program has acquired a mass of not always useful functions, moreover, it is paid. We will consider its analogue, free utility called PicPick. In addition to its main function, PicPick provides several other useful tools for working with the screen.
Let's install PicPick and prepare the utility for work. In the configuration, we set hot keys for different types screen capture. PicPick uses the key by default PrintScreen combined with other special keys... For example, to capture the entire screen, the key is defined PrintScreen (the same key is used by the operating room itself Windows system), and to capture the active window, you need to click already Alt + PrintScreen ... Hotkeys are set for capturing the toolbar, scrolling window, selection, fixed and arbitrary areas.
The initial PicPick settings install the following screen capture mechanism: after pressing the hot keys, the screenshot is opened in the built-in program editor, after which it can be processed and saved to a file.

The editor's capabilities allow you to apply standard blur, sharpening, brightness, saturation, contrast and hue effects to the image. Also in the editor, you can invert colors, convert them to grayscale, add pixelation and a frame (border or shadow). Of course, there are tools for resizing, rotating, flipping and cropping an image, selecting, drawing, filling, entering text.
The screenshot processed in the PicPick editor can be either saved to disk or transferred to any of the applications Office suite... With an Internet connection, the image can easily be sent from the program to Facebook, Twitter, FTP server, web page, or Outlook.
In order for the image captured from the screen to be immediately saved to a file, open Settings - Saving and enable the option Saving images automatically... Here we select the folder where the files will be saved. In this case, after pressing the hot keys, the program will save the screenshot in a file and open the file in its own editor. PicPick supports the following graphic file formats for saving: JPG, PNG, BMP or GIF.

The type of the file saved by default is specified in the settings in the section File name... In the same place, by the way, you can configure the file name format.
If opening the captured screen in the editor is undesirable (for example, you need to quickly “grab” several dozen snapshots), go to the Snapshot section in the settings and select the program behavior. The default action is defined Open in PicPick editor... In our case, we set Save to file, but you can also choose to copy to the clipboard, print, and the previously discussed methods of transferring the image.
In addition to the main function - image capture, PicPick provides a whole set of additional opportunities... You can quickly access them either through the menu invoked by clicking on the program icon in the system tray, or by hot keys.

Function Color under cursor starts the process of tracking the color of pixels under the cursor. A small window appears on the screen, where the pixels under the cursor are visible on an enlarged scale. The HTML code of the color under the cursor is also indicated here. After clicking, a window is displayed Color matching with selected color and palette. In addition to the html code, you can find out the RGB color format, as well as for the C ++ and Delphi languages.

Screen magnifier works in much the same way as the similar built-in Windows tool... When you move the cursor, an enlarged screen image is displayed in a small window.

Tool Ruler displays a horizontal or vertical ruler with markings on the screen. The ruler can be easily moved around the screen with both the mouse and the keys. You can set the units of measurement (pixels, inches, centimeters), set the transparency level and color. To close the PicPick ruler, just press the key Esc .

Protractor useful when you need to quickly measure the angle. Select the tool, click at the origin point, after which two coordinate lines are displayed on the screen. Now move the cursor to mark the first line, click and repeat the procedure to mark the second line. Along the way, the angle between the two segments is also displayed here.

The Crosshair tool lets you draw a rectangular area on the screen while showing the coordinates of the crosshair center (horizontal and vertical pixel numbers). Moreover, with the second movement of the guide lines, the offset from the first crosshair in pixels is already displayed.

Another tool called Slate displays a small panel with several functions on the screen and enables a special screen mode. So, the contents of the screen can be scaled, moved, drawn lines, arrows (pointers) and simple shapes (rectangle, ellipse) on it. At any time, everything that we have drawn on the screen can be saved to a file.

In general, PicPick is quite impressive in its capabilities and in many respects is not inferior to similar programs. And since it is free, the utility can be considered as the main tool for capturing the screen.
Specifications:
Interface language: Russian, English and others
OS: Windows XP, Vista, 7
File size: 3.5 Mb
License: free for personal use
With this post I would like to summarize an overview of the PicPick program, designed to take screenshots from your computer screen. Here are some recommendations, so to speak, clearly:
1. I found this - here the translation has been slightly corrected. Maybe come in handy
2. The installation of the program and its initial configuration is described in some detail in the video tutorial How to take a screenshot in PicPick -1. And here we will see in pictures:
Installation
PicPick is installed in just two clicks, but it all depends on which installation package you downloaded. On the developer's site, you can find two links to the most latest version(download links can be found at the end of this post). There is a standard EXE file installations as well ZIP archive, which does not require installation, it is enough to unpack the archive to a convenient place and run the program.
At the first start, the settings window will automatically start:
Rice. 1 Installation and initial configuration
You can specify the interface language, of course we do " Russian ", put a tick "Run Program at Startup"(Put the program into Startup, i.e. PicPick will be automatically loaded along with the system boot, this is convenient and quite reasonable. It should be noted that the program is not at all demanding on system resources).
The next option is " Check for programm updates"(automatic check for program updates), set as you wish.
At the same time, you can change the configuration of the hotkeys, but I recommend not to do this for now, because until we click [OK], the interface will remain English, and we will understand little if English is not our native language. Secondly, all these settings can be done in the future, well, and thirdly, the default settings are fully optimal.
On this we press [OK], that's all: the program is installed and even already launched and working. In the tray, next to the clock, we have a new icon
Rice. 2 Tray icon (easel)
3. About working with the program, too, everything is downright well, oh-oh-very well described in video tutorials
But I think it will not be superfluous to run some more.
Working with the program
The program is controlled by hot keys and clicking on this icon. So what we see.
Rice. 3 Main menu of the program
Right-clicking or left-clicking on the program icon opens the main menu, where a huge variety of tools and ways to create screenshots are available to us.
To see what methods of taking pictures there are, you can look into the hotkey settings, where all this is wonderfully painted.
Rice. 4 Opening the hotkey settings window
Rice. 5 Hotkey settings window
As you can see, we have the ability to take pictures in many ways, as well as use a number of graphic utilities (tools).
The next thing we may need from the settings is a way to save images. There are several of them too:
Rice. 5 Settings window "What to do with the photo? "
Send to PicPick editor - the finished screenshot will be sent to the PicPick image editor, which is included in the package of this program
Copy to clipboard - the screenshot will be placed in the computer memory, later you can paste it, for example, directly into Word or another (favorite) editor.
Automatically save as ... - screenshots will be saved to the folders you specified with specific names (by mask)
And so, let's try to take a snapshot of an arbitrary area Of course, you have already seen what it is more than once, and now I will tell you how it is done using PicPick. Press the CTRL + SHIFT + PrtScn keys at the same time, after which the mouse cursor turns into + (cross), select an arbitrary area of the screen, describing a circle or other figure and that's it! After the shape is finished (i.e. a continuous line is formed (circle, square, triangle), the finished screenshot will be saved where you specified it in the settings.
Rice. 6 Snapshot of an arbitrary area
I think that now you shouldn't have any questions about how to take screenshots with PicPick. You can try to take pictures of the screen in different modes yourself.
Rice. 8 Snapshot of a fixed area
And, finally, do not forget to look at the mini-utilities included in the program package, such as "Ruler", "Protractor", "Intersection", etc. And other settings - there are not many of them, but they may be useful to you.
I hope you will be able to appreciate this program, both in professional and private use.
Official website of the program http://picpick.wiziple.net/center
Download the program: Exe installer http://picpick.wiziple.net/picpick_inst.exe
Taken from the site picpick.softobzor.ru In my opinion, everything is clear ... It remains only to try.
And you can also look at other programs for taking screenshots, if for some reason you are not satisfied with the PicPick program
Hello, today I will tell you about the screenshot program and, in combination, the graphics editor PicPick. This is a free program.
I have been using it for several years, it replaces me Photoshop in such simple tasks as: resize, crop, add text, etc.


 4. Brightness / contrast
Of course, to do color correction it is more logical to use Photoshop, but sometimes no special changes are required - just a little brighter. Then you can bypass the functions PicPick - In chapter Image - Effects - Brightness / Contrast ... (for example, with a photo from a review about Miracle Yogurt):

 5. Photo frame
Sometimes you want to make some kind of frame for a photo - in Picpick there are several: for example, notepad. the framework is in the section Image - Effects - Frame ...
 6. Cropping a photo
To cut out a part of the photo, you need to go to , select the desired area, the program will open new section menu and there you need to choose Pruning (using the example of a photo from a review about hazelnut oil)


 7. Reduce photo
To reduce the photo you need to go to the section Image - Size - Resize image:
 8. Easy copying of the edited picture into Word.
This is very convenient, since you can not even save the photo, took a screenshot and immediately added the text, and with one click of the button you copy: section Clipboard - Copy ..

and in Word just press Ctrl V and the picture is inserted:

When you need to crop and paste a lot of pictures, it saves time. Pictures in document Word are saved without saving the original picture in PicPick, a Picpick in addition, it supports opening a large number of pictures and screenshots at the same time.
9. Hide face in photo, etc.
I personally do not hide my face in the photo for reviews, but maybe someone will come in handy. You need to select in the section Tools - Area - Rectangular Selection ... , select the area you want to hide:
In the new menu Options - Pixelate ...
 Well, the face is not visible :)
Can burn bank card number, surname on a sea ticket, price on a box, data in a passport, etc.
10. Saving in various formats
Transparency Picpick does not support so save in PNG image or GIF doesn't make much sense. I keep always in JPG:

Screenshot (snapshot, photo) of the screen is a very useful function that allows you to quickly take a picture of the monitor screen and save the image.
The easiest option- use the key PrintScreen on keyboard. In this case, the entire screen of your monitor will be visible in the picture. When you press PrintScreen, an image of your desktop will be copied to the clipboard, which can be pasted into any graphic editor (as if you had just copied the picture). We did not bother too much and inserted the image obtained using PrintScreen into Paint... (fig. 1).
It is also possible to take a picture active window only... In this case, a screenshot of the window of the program that is in this moment used. To do this, press the key combination Alt + PrintScreen... Since now we have an active MS Office Word application, when you press Alt + PrintScreen, only a Word photo will appear in the clipboard (Fig. 2).

But often the capabilities of the PrintScreen and Alt + PrintScreen keys are not enough to take the required screenshot. For example, if you want to cut out a part of an image and only take a picture of that part. Or if the image area does not fit on the screen. In this case, you will have to use special programs for working with screenshots. There are a lot of such programs on the Internet. In this article, we will introduce one of them - Picpick.
Picpick free for home use program.
Downloading the program
You can download it from the official website at this link.

Program installation
Despite the fact that PicPick is installed in English, it is not difficult to understand it. Follow the instructions of the installation wizard. In general, as usual, nothing difficult. During the installation process, you will be prompted to install Yandex.Bar, make Yandex home page browser and make Yandex the default search engine (Fig. 4). Check the boxes of the options you need and click Next and the normal installation process continues.

Working with the program
Immediately after launching PicPick, we are greeted by the program's help window (Fig. 5).

The main menu of the program is located on the left. Take a look at the points presented in it. You can easily figure out what's what.
By clicking on this image, we will open work panel PicPick (fig. 7).

Because The main task of the PicPick program is to take high-quality screenshots of the screen, we will dwell on this function in detail.
To create screenshots, use the tool Screen capture... When you click on it, a list of available options appears (Fig. 8).

You can immediately determine what actions to perform with the resulting screenshot ( The resulting snapshot), and also select the screenshot format ( Default image format).
For example, PicPick has a very useful screen capture feature - Scrolling window... In this case, in the screenshot you will get the whole size of the image, and not just the part that is visible on the screen.
Let's say we have a large drawing or website page that does not completely fit on the small screen of a netbook. You can, of course, take several screenshots, and then glue them into one, but this is very inconvenient. It is much easier to use the Scrolling Window function. So, we want to get a screenshot of the whole page of the site. The entire page does not fit on the monitor screen (we have to scroll), so to create a screenshot we will use the PicPick program and select the Scrolling Window function from the menu.
After that, you will need to select an area (it is highlighted with a colored frame) and press left button mouse, PicPick will automatically start scrolling the screen. The resulting screenshot will appear on the clipboard as usual. We just pasted it into Paint. The result in Fig. nine.

Also, PicPick has some pretty interesting features: Highlighted area,Fixed area and Arbitrary area... As the names suggest, using one of these functions, you can take exactly the screenshot you need.