How to write an application for. How to create a mobile application for Android yourself. Apps for making games
Comes to everyone's mind - seasoned designers, students, or small business owners who haven't written a single line of code. If you have a great idea, how to implement it if you don't understand the difference between Java and Javascript, or Photoshop and Illustrator?
How to make a mobile app - expert opinion
- Paul Ferro, President of 5 Nerds Software Development, a full-service design and development agency from branding and design to application development from the ground up.
- Andres Max, founder of Ideaware, an agency specializing in product strategy, UX / UI design and front-end optimization. Prior to founding the studio, Max was the lead UX designer at Mashable.
- Daniel Hindi is Chief Technology Officer at BuildFire, a mobile app development platform used by over 50,000 companies. Even if you don't know how to create mobile apps, you can still make a professional app with BuildFire's WYSIWYG editor.
The responses from these entrepreneurs make it clear to us that building a mobile app doesn't necessarily involve coding or getting your hands dirty at Adobe. With a great idea, a dash of business acumen, and a ton of effort, you can be at the helm of the next Uber. Let's take a look at their opinions.
1. Brainstorming
Paul Ferro talks about the first step on this long journey, who, in addition to starting his own business, helps other entrepreneurs to bring their ideas to life:
You have a great idea for a mobile app. It's the next viral game, or utility that everyone will use, or the next step in social expression. In any case, you know that this is great and you want to convey your idea to everyone. Where to begin?
First, it is very important to flesh out your idea. You can sketch the basics of your application in your head, but have you thought of all the little details that separate a fantastic application from a normal one? It's very important to sit down and think about the entire experience of using the mobile app for a few minutes.
If this is a game or something similar, then you do not need to compose each level in your head, but you need to understand how the levels differ. Are there in-app purchases? Multiplayer game? Social media connection? As you answer all these questions, you begin to mentally put all the pieces together and overcome all the problems and pitfalls. Or, if someone is making the application for you, they will want to know as much as possible before starting, and this will help the development process.
2. Submit your idea to friends, family and colleagues for feedback
Everyone thinks their ideas are amazing, don't they? How can you understand that the concept of a mobile application that you have invented seems interesting to others? Turn your inner circle into a cordon sanitaire that tests ideas for viability:
Now that you have a working idea, it's time to test it out and see if it's really as good as you think it is. There are tons of good apps that do almost the same thing, but for one reason or another, some rise to the top and become loved, while others don't. Your app doesn't have to be # 1 in the store to be popular or profitable. But he needs at least some semblance.
Get your idea across to maximum number people to get their opinion of her. Here's an expert's advice: When you present your idea to others (friends or family), tell them that you know someone with the idea and want to invest in it. Then explain the idea itself. Your listeners will be much more honest knowing that the idea is not yours and that you could lose your money by investing in the wrong good app... Ask - will they use it? If so, why? If not, why not?
Ask them to point out flaws. Ask if they've seen anything similar? This approach can be much more productive for discussing an idea than simply finding out that you have a lot of friends and family who don't want to hurt you.
If you have done all this several times, and your idea has not met with strong opposition, then it's time to start! This is where you have a choice. You can do it yourself or hire someone.
3. Even if you can't make a mobile app, you can make a great prototype.

Andres Max reiterates his statement about the importance of testing an idea for performance and goes further: “I have always encouraged entrepreneurs to do market research. Dig deep to assess the demand for your idea, what worked and what didn't, then make adjustments as needed. ” For example, you may think you have a great idea for a photography app before you know it’s already made and sold. This does not mean that you have to stop working on the idea - it is just information for you to help you understand what you can do better.
One of better ways to compare is, of course, to make a prototype. Max says: “After you've got your idea sharpened, build and test a prototype. Gather all the valuable information on its basis ”. A prototype can be just a sketch of your design, or you can create a fully functional prototype in a tool like Proto.io. This does not require programming or design skills.
4. Decide if you will hire a studio or a developer - or learn how to develop yourself.
The next step, Ferro says, is to figure out who will turn your prototype into a real application. Believe it or not, you can easily create the application yourself (even without experience). Provided, of course, that it is simple enough:
“Learning how to build apps can be challenging, especially if you don't have experience. But it is possible. Especially if your idea is about the uniqueness of the functions - and not the technologies themselves. Take Flappy Bird, for example. The application itself is extremely simple. But the idea was unique and exciting. Now look at the Apple Passbook. The idea is relatively simple, but the technologies that keep your data safe, contact sellers, tethering your fingerprint, and the like are relatively complex.
If you need advanced technology in an app that uses a device in a way that no one else has used it, then building the app yourself can be difficult. To understand how to use all the possibilities mobile device, it can take years. If you realize that you can build the application yourself, great! But even if you don’t have development skills, there is an opportunity to develop quite quickly. ”
5. Make sure you are using the right tools to create mobile apps

But how to gain this very speed? You can either walk through (there are many resources for that) or use tools that even beginners can use to build your mobile app. One such tool is BuildFire, explains Daniel Hindi:
“What if you have a killer idea but don't know how to build mobile apps? This is exactly the problem we wanted to solve in our BuildFire platform. We have over 80,000 applications, they are created by both small companies and large corporations, all of them are made with no or minimal programming knowledge at all. While this is fine for simple applications but lack of programming skills usually limits you to the range of features the platform offers. BuildFire solves this problem and soon we will open an API for developers that can be added to existing BuildFire applications.
We see more and more startups and small companies connecting to our core platform with extremely low entry barriers. Once the app has proven its worth, they ask third party developers create the missing pieces of the puzzle, saving you a lot of time and money. ”
6. Make sure you are hiring the right people
Whether you're hiring people to finish a project started on a platform like BuildFire or building an app from scratch, finding the right developer is important, Ferro says:
“Now, if you decide to hire someone to develop your application, it’s a little easier than learning to code yourself. But here, of course, the question of cost arises. Hiring an office has a number of advantages over self-development... They have experience, they already know all the pitfalls of development, they will make an optimized and quick application, its design will not be terrible - I think that it is not necessary to explain in detail the advantages of contacting professionals.
But you need to make sure you are hiring the right professionals. First and foremost, this means finding a company that will listen to your story and fully understand it even before you start coding. Many people want to jump right into development and start invoicing you, but that's not the way to go. Talk to several companies to find the one that works for you. You should feel comfortable working with them, communicating and overcoming problems with them. And believe me - there will be problems!
When you find the right company, everything will work out. They will dive into your idea and unravel the loops, fill in the gaps, suggest features and functions by providing high level service. Top Apps comes when a great idea meets a great team that breathes life into it. ”
Time to act
Ferro ends up reminding entrepreneurs that building an app is one thing, but getting users to download it is another:
So you've made and released your app. Don't stop there. Promote it. Talk about him. Share it on social networks- everywhere! You need to be talked about. There are many ways to promote your app and you should try them all. Blogs are always looking for new apps to share. Contact them. If your app is a utility, figure out where it can be most useful and tell people about it. Whatever you do, you should always share your application as much as possible.
And how are you doing? Have you made the app of your dreams? Tell us about it!
No financial investment and special knowledge.
Here simplest instruction how to create a rudimentary iOS app and try it out on your device. Starting from it, you can go deeper into the topic and create really useful programs.
Note for Windows users: to create iOS apps you need to have OS X installed on virtual machine(VirtualBox, VMware). This process is by no means simple and requires a separate instruction for its implementation.
1. Go to App Store and install Xcode development environment :

If you already have Xcode, then you need to update it.
2. Run xCode and select the menu item File -> New -> Project: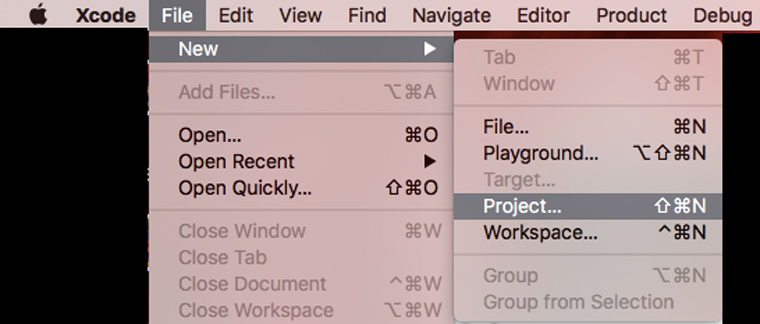
3. Select the platform and type of application:

4. We indicate information about the project. Please note that we have selected the "Universal" application type: 
5. Press the button New Folder and specify the name of the folder in which we will store the application files:

6. Uncheck the Create Git Repository checkbox and click the Create button. As a result, you should get to the start screen of working on the application: 
7. Click on the item Main.storyboard in the right menu, drag the element to the main field Label and add text to it Hello_world:

8. Now we need to create an icon for the application. We select a picture and upload it to mapappicon.com:
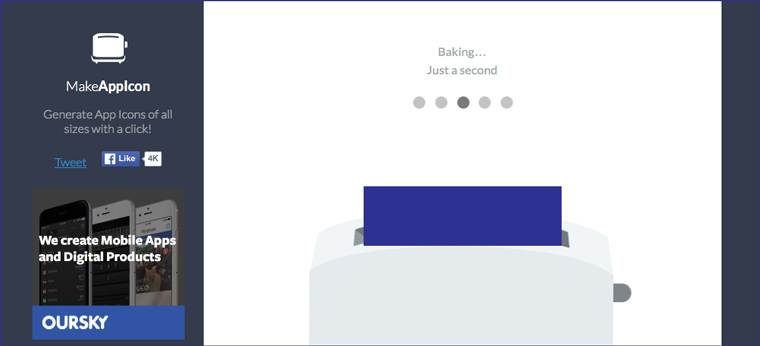
9. We are waiting for the web application to finish work and indicate our address Email to get an archive with icons:
![]()
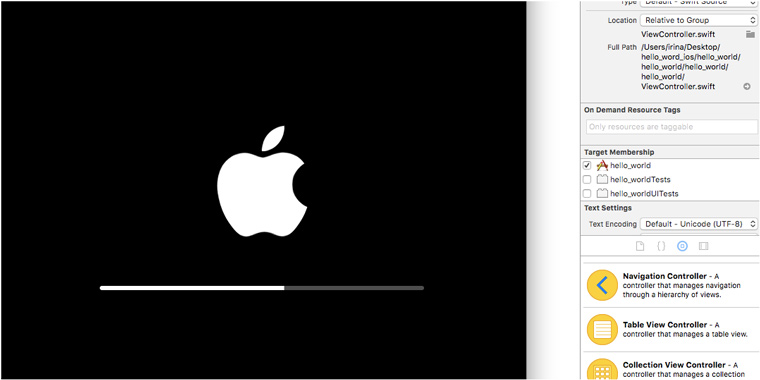
10. Return to Xcode and select the section in the left menu Assets.xassets:
![]()
11. Open the archive from mail and drag the icons from there to the Xcode workspace:
![]()
12. Select one of the device simulators, click on the application launch button (black triangle) and turn it on on your Mac Developer Mode:

13. We try to start again. We are waiting for iOS to load on the simulator:
14. Make sure the application works:

We look at the finished application on the device
Now you can see how the application works on the device. Make sure you have the latest versions of XCode and iOS before following the instructions.
1. Go to xCode -> Preferencies -> Accounts and add your Apple ID:

2. Connect the iOS device to the computer:

3. Choose desired device in the list and click on the start button. We are waiting for a while.
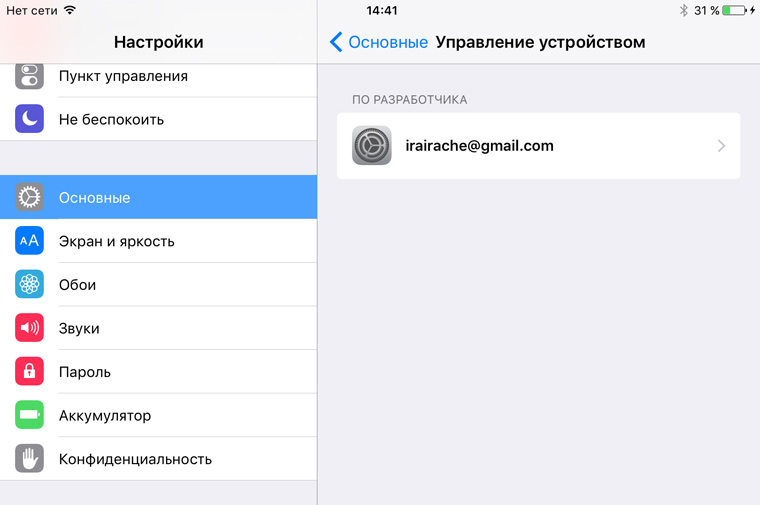
4. If a message about security problems comes out, then on the iOS device go to Settings -> The main -> Device management and allow the launch of applications from the developer with your Apple ID:

5. We go to the desktop and find the icon of the new application:
6. Run:

7. Disconnect the device from the computer. Now the application can be used.
What if you want more?
Using scientific typing and Google, you can extend the above sequence of actions and create a more functional application. But you can only use it on your own devices.
After all, Apple has very high requirements for applications. The App Store Review Guidelines includes 29 points and over a hundred sub-points. In order for the application to comply with them and be accepted for publication in the store, the developer requires a large amount of technical knowledge.
If you want to create high-quality iOS apps for mainstream use, you have to learn!

How to develop a profitable Mobile application or how to hit the target!
If you have an idea for creating, you can be sure that it will work and even generate income, provided that your mobile app will be incredibly useful to the user. This can be optimization of everyday tasks or solving user problems (paying traffic fines or pre-registering at a car wash, etc.) or solving the problem of the user's time in his smartphone.
It all starts with an idea
It's pointless to create an application if you have no idea. Therefore, at the very beginning it is recommended to think over everything well. An important point- know for whom the utility will be intended and what functions it will perform.
A large number of well-known mobile applications were not part of the interests of the creators. These are games that are always in high positions in the rating. Perhaps everyone already knows about Minecraft, Templ Run and others.
With the help of gaming applications, it is possible to get more profit, because people are more willing to lay out their money just for them. Especially if these are popular projects. You should not be discouraged if the idea you want to implement already exists and is even posted on the App Store. Still, those who think outside the box win. You need to look at similar proposals and understand what is missing and make them better.
For example, if there are already several utilities that provide information about popular places in Moscow, they can compete with a program that shows places in the city that are not known to everyone.
There are a few key points to keep in mind when coming up with an idea:
- Assessing capabilities when creating an application yourself. V simple developments mobile applications, you can make a simple mobile application yourself.
- If you have a mobile application with specific business processes or a technically complex mobile application, then you will need to develop from scratch. If your mobile application will function as an online store, then we recommend using a ready-made solution for 1c Bitrix Mobile application. Expand it and, over time, refine the necessary functionality. To do this, you need to find a mobile application developer company.
- If the mobile application is from the B2C segment, for example, as a cafe, pizzeria, taxi service, bank mobile application, Mobile Internet a client of a bank, a mobile application of a travel agency, then you can use the already developed ready-made mobile applications from the development companies or find design sites on which you can develop the application yourself (in this case, you can make it with a simple straightforward functionality).
- It is important to highlight and evaluate the usefulness of the future application.
- Decide if the utility needs daily monitoring.
- Select the platforms for which the future mobile phone is intended (IOS, Android, Windows Background).
What are the applications
There are many types and categories. Below is a list of the most popular ones.
- Toys (the simple colorful "shooter" Angry Birds has won recognition among many users);
- Traveler Resources (As a good example of TripAdvisor);
- Social networks (Vkontakte, Odnoklassniki);
- News feeds (A well-known version - RIA Novosti);
- Projects for music lovers (Spotify is a prime example);
- Resources with video content (Vine);
- Supporting utilities (For example, translator);
- Photo networks (Instagram), etc.
How to make an application earn
Before starting development, it is necessary to determine the monetization of a mobile application. There are several options for monetizing projects:
- Free distribution. Such programs are used by large corporations and allow them to promote a range of products and services.
- Free with ads. This type is often found in popular projects that actively interact with users.
- Paid system. The most profitable of all. Similar applications are used by Apple, which earns commissions (up to 30%) from sales.
- Light (Lite) and Professional (Pro) versions. The first one is free, but contains limited functionality, which is available in full with the purchase of the Pro version.
- Domestic purchases. The functionality of the application and new game features of the character are gradually acquired by users for real money.
Development stage
When you already have an idea, that's half the battle.
For those who do not want to bother themselves too much, but are ready to shell out a certain amount, there are proposals from mobile application developers. We are in the process of developing custom mobile applications.
The easiest and cheapest way to find a specialist is to contact freelance exchanges. But, if an unscrupulous employee comes across, there is a risk that the project will be delivered to you not on time and, perhaps, the contractor will ask for an additional amount for the development (since initially, due to inexperience, he did not correctly determine the amount of work).
Below are the questions to ask developers:
- What is the cost of developer work for 1 hour?
- Portfolio of completed projects?
- Will the customer own the rights to the application?
- Are there opportunities and experience to bring the idea to life?
- What platforms does it work with?
How much does it cost to develop an application
Before you can make a large amount of money, you must first spend it. This statement is not always true. But if we assume that the application is ordered from specialists, there are several nuances of the final cost.
The price can fluctuate between 50,000-5,000,000 rubles, depending on the type of application and its capabilities. It may seem very costly (especially the last figure), but as the popularity of a high-quality application develops, the profit will pay off all the costs several times.
Most expensive games. They are often top sellers.
When a project has already been developed at some stage, or there is at least a layout, the price can be significantly reduced. Another option to reduce upfront costs is to offer the developer a percentage of the program's profits. When the app is ready, it should be posted on the App Store. This is also not a free step. The amount that will have to be paid is approximately $ 100 per year. Placing on the Android Market will cost $ 25.
If you create an application for free

When there is no desire and opportunity to invest money, you can go the other way and use the builders of mobile applications. These extensions work in the online system and allow you to make the simplest utility or "toy" for free without programming skills. But, if you need something individual and more complex, there is a paid tariff for this.
Here are some constructors:
- My-apps.com. Provided 10 ready-made templates for the development of business systems (taxi, pizza delivery, online store, etc.).
- Net2Share.com. Constructor is completely free and created for Android applications. An internal promotion system is in place. As part of the program, training seminars on the specifics of creating mobile applications are regularly held.
- ibuildapp.com. Constructor for developing applications running on iOS and Android platforms. According to the Russian version of the site, the tariff will be about 500 rubles.
- MobiumApps.com. Designed for Android, Apple iOS and Windows Phone... The system is paid. One application can cost 10,000 rubles per month (if unlimited tariff), or 7 rubles for each installation.
- AppsGeyser.com. Cheap constructor. The system is free, but full of ads. Designed for bloggers and online publications that deliver content to subscribers.
- BuildAnApp.com. Builder created for BlackBerry, Windows, iOS and Android. Subscription fee will be around $ 20. Generation is carried out in just 6 stages.
- ViziApps.com. System for development on Android, Apple iOS and HTML5. The monthly rate is around $ 100 per month. Publishing costs around $ 400. The service copes well with ideas for business processes.
How much money can you earn on the app?
All money received through the application directly depends on its popularity. Therefore, it is difficult to immediately say a specific figure. GigaOM PRO conducted research that showed that about half of developers earn about $ 500 every month and only 4% of mobile applications bring in millions of rubles in profit. This amount is very small to live only on the income from the application. Earning money is perfect for those who just want to earn some money.
Geniuses who are able to recreate a project that are not inferior in profit to Angry Birds have the opportunity to receive up to $ 100,000 every month. To make good money on the application, you need to consider the following:
- The idea and the application as a whole should be of interest to a large audience;
- Before starting creation, it is recommended to research all existing hits;
- The easiest way to make money is on applications for IOS; RuTaxi
Development of mobile version website, landing page and mobile application for a taxi service
rutaxi.ruDo you want the same project or even cooler?
Write to us about it!
I am neither the first nor the last to come across an annoying icon in the form exclamation mark in a triangle on android. There is not enough internal memory, and all applications are written there by default.
You have to delete some possibly important files or transfer them to your PC. But there is a solution to this problem.
You just need to make sure that all programs are saved on the flash card.
How to make apps install to android memory card
First of all, you need to find out the OC version, since there are methods that are suitable, for example, for Jelly Bean, but no longer work on Kit-Kat. To do this, you will need to do the following:
- go to the menu;
- find the "Settings" icon;
- at the very bottom of the list we find the item "About device", in which the current version of your operating system will be displayed.
Android 2.2 - 4.2.2
Without leaving the "Settings", we find the item "Memory", which is located in this case between "Battery" and "Screen".

Then we click on the inscription "SD-card" in the list "Disk for recording by default". After clicking, a check mark will appear in front of it or a circle will light up.
Now try downloading something from PlayMarket, everything should be saved on the flash drive.

Android Kit-Kat and above
With later versions of Android, things are more complicated. You need to be rooted to install apps on the SD card. The fact is that Google no longer uses this function due to the fact that today there are "clouds" in which you can store all the necessary information.
But in our country, the Internet service is not so developed that it was possible to download all the necessary files from cloud services at the moment.
It is better to obtain root-rights by contacting specialists, since there is a possibility of failure of your mobile phone... You can also do this with your own hands, since there are many different articles on the network on this topic.
I can only offer a few utilities to get full access to your device: GingerBreak, Baidu Root, 360 Root(without using a PC), SuperOneClick, RootkitZ(using a computer). I cannot say which of this will help you, since on different devices they work in different ways.
This was a small digression, now let's move on to the main thing - how to make applications install on the android memory card , Kit-Kat and above. To do this, you will need to follow the instructions below step by step:
- after purchasing the rights, go to Google Play;
- in the search we drive in: "SDFix: KitKat Writable MicroSD";
- install (for now on the phone's memory);
- when you open the program, do not be alarmed that everything is in English, it is not worth reading and translating, just click on the "Continue" button (blue screen);

- on the purple screen, put a check mark in front of the inscription informing about the improvement of your device;

- within 2-3 minutes the orange display will be established, you will have to wait a little;

- as soon as the color appears green, you will be able to install all applications on the Micro SD by default.

Method of replacing the built-in memory with a flash drive
This method also assumes superuser rights. In addition, you will need the utility Root Explorer... In it we find the / system / etc folder, where we click on the inscription "RW rights".
Using the editor, go to the vold fstab file and find the following entries in it (without the hash tag):
dev_mount sdcard / mnt / sdcard [email protected]/devices/platform/goldfish_mmc.0 /devices/platform/mtk-sd.0/mmc_host
dev_mount sdcard / mnt / sdcard2 auto /devices/platform/goldfish_mmc.1 /devices/platform/mtk-sd.1/mmc_host
In the first entry after / mnt / sdcard we put the number 2, in the second we remove it.
After these simple manipulations, the volume of your internal memory will be equal to the size of the memory of the SD card, and you can safely record there anything from Play Market without fear that free place will fill up quickly.
Move2SDEnabler
This software, in addition to the fact that it allows you to save installed applications directly to external media, makes it possible to transfer already used programs there (if they support such a function).
And this way also assumes presence of root, what can you do - our hands are tied without these rights.
So, let's start by going to "Settings". The next step is Applications, then Development. There you will need to check the box next to "USB debugging". This is done to keep the application running properly.
Now is the time to go into the application itself. We agree with all the rules by clicking on "I’ve read it" and "Next".
After that, we select one of the proposed options:
- Auto - the device automatically chooses in which section to save the loaded (while the function of transferring programs to a flash drive does not work);
- Internal - applications will be installed on the phone's own memory;
- External - the memory card becomes the main carrier for the installed programs.
For our case, the third option is suitable. Click "Apply", in the window that appears with the message about the activation of Move to SD, click "Yes".
If none of the suggested methods worked
In theory, if you follow the method described above, then everything should work out, but anything can happen. Do not despair. I can suggest a method that will free up space by transferring programs to a flash card.
In this case, the newly installed software will be saved in the same way as before, to the device, and not to an external medium.
So, we follow the suggested path: Menu → Settings → Applications → Application management. Next, we find the item "All" or "Third-Party", where we click on the application that needs to be transferred.
The Move to SD Card button will do the trick. If it is gray, it means that it is inactive, that is, the creators of this software did not provide for the transfer function. Yes, it happens.
Well, that's basically it. I hope this article will help you solve the problem with the limited amount of internal memory.
This tutorial will teach you the basics of how to write an Android application using the framework android development Studio. Android devices are becoming more and more common, the demand for new applications is only increasing all the time. Android Studio is a free, easy-to-use development environment.
For this tutorial, it is best if you have at least a superficial knowledge of the Java language as it is the language used by Android. There will not be too much code in the lesson, since I assume that you are a little familiar with Java or are ready to find something that you do not already know. The creation of the application will take 30-60 minutes, depending on how quickly you download and install all the necessary programs. After reading this tutorial on creating your first Android application, you may find yourself a new fun hobby or even start a career as a promising mobile application developer.
Stage 1: Install Android Studio


- JDK must be installed ( Java Development Kit) and JRE (Java Runtime Environment). You can download this link. Choose the version for your OS there, accept the license agreement, download and install.
- Now go here http://developer.android.com/sdk/index.html and download (be careful, you will have to download about 3 gigabytes).
- We start the installation and follow the instructions.
Stage 2: Create a new project


- Open Android Studio.
- On the menu " Quick Start", Select" Start a new Android Studio project».
- In the window " Create New Project"(The window that opened), name your project" HelloWorld».
- Company name optional. *
- Click " Next».
- Make sure to check only the “ Phone and Tablet».
- If you are planning to test your first application on your phone, then make sure that the correct version of Android is selected (no older than the one on the phone).
- Click " Next».
- Select " Blank Activity».
- Click " Next».
- Leave all other fields as they are.
- Click " Finish».
* Typical company names for android projects "example.name.here.com".
Stage 3: Editing the greeting


- Go to the tab activity_main.xml it is most likely already active.
- Make sure the tab is active at the bottom of the screen Design(most likely it is).
- Drag the phrase “ Hello, World! »From the upper left corner of the phone to the center of the screen.
- There is a folder tree on the left side of the screen. Open a folder called " values».
- In this folder, double-click on the file “ strings.xml».
- In this file, find the line containing the text “ Hello world!"And add to this text" Welcometomyapp! ».
- Return to the " activity_main.xml».
- Make sure your text is centered on your phone screen and contains the text “ Helloworld! Welcometomyapp! ».
Stage 4: Add a Button

- On the tab “ activity_main.xml"Select the tab below" Design».
- In the column to the left of the phone window, look for a folder called “ Widgets". There are various buttons there.
- Take the button " Button»And drag it to the phone screen. It should be centered on the screen, right below your text.
- Make sure the button is still selected (blue frame around it).
- In the lower right corner there is a window with the properties of the selected object. Scroll down and find the line titled “ text».
- Change the text " New Button" on " Next Page».
Stage 5: Create Second Activity

- At the top of the tree file system project, click right click mouse on the folder called " app».
- Please select New> Activity> Blank Activity.
- In the window that appears, in the top line, enter “ SecondActivity».
- Click " Finish».
- Go to the " activity_second.xml"And make sure the" Design».
- Move the text from the top left corner of the phone to the center of the screen as we did in the previous steps.
- Make sure the text box is still selected (blue frame) and in the lower right corner of the object properties look for the line “ id"And enter there" text2 ».
- In the upper left corner (in the project tree), double-click " strings.xml».
- Under the line
Hello world! Welcome to my app! add the following line
Welcome to the second page! - Return to the " activity_second.xml».
- Select the text box again.
- In the lower right corner in the properties of the object, find the line “ text"And enter there «@ string/ second_page».
- Make sure the text box now says “ Welcometothesecondpage! »And the blog is centered on the screen.
Stage 6: prescribing an action for the button


Stage 7: Testing the Application

- In the toolbar at the top of the Android Studio window, click on the green play symbol.
- In the window " ChooseDevice"Select the item" Launchemulator»And select the device.
- Click on the " OK».
- When the emulator starts (this may take a long time), the application will automatically open on the virtual device.
- Make sure all text is displayed correctly and clicking on the button takes you to the next page.
Attention: If you receive the message “ HAX kernel module is not installed!", Then two options are possible. The fact is that this virtualization is supported only by modern Intel processors and you only need to enable it in the BIOS. If you have a processor that does not support this function, you will have to test the application on a real phone or use a third-party emulator instead of the built-in one.
How to get .apk file in Android Studio
In my opinion, this issue is well covered in this article, so I will not repeat myself. The easiest for the first lesson seemed to me Manual way.
When you receive the file, you can copy it to your phone and install the application.
Step 8: Result

Congratulations! You've just finished writing your first Android app with some basic functionality... The finished application should have a user welcome page and a button that takes the user to the second page.
You got a glimpse of the development of applications for android and perhaps aroused in yourself the desire to learn everything that is necessary in order to further develop in this direction.