Easy and fast self-configuration of a Wi-Fi router. How to connect and configure a Wi-Fi router? Step-by-step instructions for all models How to set up a guarantor modem
Good day.
So that you can organize a wireless Wi-Fi network at home and give everyone access to the Internet mobile devices(laptops, tablets, phones, etc.) - you need a router (even many novice users are already aware of this). True, not everyone decides to connect it and configure it on their own ...
In fact, the majority can do it (I do not take into account the exceptional cases when an Internet provider creates such a "jungle" with its own parameters for accessing the Internet ...). In this article I will try to answer all the most FAQ that I heard (and hear) when connecting and setting up Wi-Fi router a. So let's get started ...
1) What kind of router do I need, how to choose it?
Perhaps this is the first question that users who want to organize a wireless Wi-Fi network at home ask themselves. I would start this question with a simple and important point: what services does your Internet provider provide (IP telephony or Internet TV), what Internet speed do you expect (5-10-50 Mbps?), And for what protocol you are connected to the Internet (for example, now popular: PPTP, PPPoE, L2PT).
Those. the functions of the router will begin to draw by themselves ... In general, this topic is quite extensive, therefore, I recommend that you familiarize yourself with one of my articles:

search and selection of a router for home -
2) How to connect a router to a computer?
As a rule, a power supply unit and a network cable for connecting to a PC are included with the router itself (see Fig. 1).
By the way, please note that on the back of the router there are several jacks for connecting a network cable: one WAN port and 4 LAN ( the number of ports depends on the router model. In the most common home routers, the configuration is as in Fig. 2).
Rice. 2. Typical rear view of the router (TP Link).
Internet cable from your ISP (which was most likely connected to network card PC) must be connected to the blue port of the router (WAN).
With the cable that comes with the router, you need to connect the computer's network card (where the provider's Internet cable was previously connected) to one of the LAN ports of the router (see Fig. 2 - yellow ports). By the way, in this way you can connect several more computers.
At an important moment! If you do not have a computer, you can connect the port of the router with a LAN cable with a laptop (netbook). The fact is that initial setup It is better (and in some cases, otherwise impossible) to carry out a router via a wired connection. After specifying all the basic parameters (configure wireless connection Wi-Fi) - then the network cable can be disconnected from the laptop, and then work via Wi-Fi.
As a rule, there are no questions about connecting cables and power supplies. We will assume that your device is connected, and the LEDs on it began to blink :).
3) How to enter the settings of the router?
This is probably the key question of the article. In most cases, this is done quite simply, but sometimes ... Let's look at the whole process in order.
By default, each router model has its own address for entering the settings (as well as login and password). In most cases, it is the same: http://192.168.1.1/ however, there are exceptions. Here are a few models:
- Asus - http://192.168.1.1 (Login: admin, Password: admin (or empty field));
- ZyXEL Keenetic - http://192.168.1.1 (Login: admin, Password: 1234);
- D-LINK - http://192.168.0.1 (Login: admin, Password: admin);
- TRENDnet - http://192.168.10.1 (Login: admin, Password: admin).
At an important moment! It is impossible to say with 100% accuracy what address, password and login your device will have (even despite the stamps I mentioned above). But in the documentation for your router, this information is necessarily indicated (most likely, on the first or last page of the user manual).
Rice. 3. Entering a username and password to access the settings of the router.
For those who failed to enter the settings of the router, there is a good article with the reasons discussed (why this could happen). I recommend using the tips, link to the article below.

How to log in at 192.168.1.1? Why doesn't it come in, the main reasons are
How to enter the Wi-Fi router settings (step by step) -
4) How to set up an Internet connection in a Wi-Fi router
Before describing these or those settings, a small footnote should be made here:
- First, even routers from one lineup can be with different firmware ( different versions). The settings menu depends on the firmware, i.e. what you will see when you go to the settings address (192.168.1.1). The language of the settings also depends on the firmware. In my example below, I will show the settings of a popular router model - TP-Link TL-WR740N (the settings are in English, but it's not so difficult to figure them out. Of course, it's even easier to set up in Russian).
- The router settings will depend on the network organization of your Internet provider. To configure the router, you need information on the connection (login, password, IP addresses, connection type, etc.), usually all that is needed is contained in the Internet connection agreement.
- For the above reasons, it is impossible to give universal instructions that are suitable for all occasions ...
Different internet providers different type connections, for example in Megaline, ID-Net, TTK, MTS, etc. PPPoE connection is used (I would call it the most popular). Plus, it provides a higher speed.
When connecting PPPoE to access the Internet, you need to know the password and login. Sometimes (like, for example, in MTS) PPPoE + Static Local is used: access to the Internet will be provided, after entering the password and login for access, the local network is configured separately - you will need: IP address, mask, gateway.
Required settings (for example PPPoE, see Fig. 4):
- You need to open the "Network / WAN" section;
- WAN Connection Type - indicate the type of connection, in this case PPPoE;
- PPPoE Connection: Username - specify the login for accessing the Internet (specified in your agreement with the Internet provider);
- PPPoE Connection: Password - password (similar);
- Secondary Connection - here either we do not specify anything (Disabled), or, for example, as in MTS, we specify Static IP (depending on the organization of your network). Usually, this setting item affects access to local network your internet service provider. If you don't need it, you don't have to worry too much;
- Connect on Demand - establish an Internet connection as needed, for example, if a user turns to an Internet browser and requests a page on the Internet. By the way, please note that there is a column below Max idle Time - this is the time after which the router (if it is idle) will be disconnected from the Internet.
- Connect Automatically - connect to the Internet automatically. In my opinion, optimal parameter, and you need to choose it ...
- Connect Manually - manually connect to the Internet (inconvenient ...). Although some users, for example, if limited traffic - it is quite possible that given type will be the most optimal, allowing them to control the traffic limit and not go into negative territory.

Rice. 4. PPPoE setup connections (MTS, TTK, etc.)
It is also worth paying attention to the Advanced tab - in it you can set DNS (they are sometimes necessary).

Rice. 5. Advanced tab in TP Link router
One more important point - many ISPs bind your MAC address of the network card and do not allow you to access the Internet if the MAC address has changed ( approx. each network card has its own unique MAC address).
Modern routers can easily emulate the desired MAC address. To do this, you need to open the tab Network / MAC Clone and press the button Clone MAC Address.
Alternatively, you can tell your new MAC address to your ISP and they will unblock it.
Note. The MAC address looks like this line: 94-0C-6D-4B-99-2F (see Figure 6).

Rice. 6. MAC address
By the way, for example in “ Billine»The type of connection is not PPPoE, a L2TP... The setup itself is done in the same way, but with some caveats:
- Wan Connection Type - the type of connection must be selected L2TP;
- Username, Password - enter the data provided by your internet provider;
- Server IP-address - tp.internet.beeline.ru;
- save the settings (the router must reboot).

Rice. 7. Configuring L2TP for Billine ...
Note. Actually, after the entered settings and restarting the router (if you did everything correctly and entered exactly the data that you need), in your laptop (computer), which you connected via a network cable, the Internet should appear! If this is the case, it remains only a small matter to set up a wireless Wi-Fi network. In the next step, we will do this ...
5) How to set up a wireless Wi-Fi network in a router
Wireless setup Wi-Fi networks, in most cases, comes down to specifying the network name and password to access it. As an example, I'll show the same router (though I'll take the Russian firmware to show both the Russian and English versions).
First you need to open the Wireless section, see fig. 8. Next, set the following settings:
- Network name - the name that you will see when searching for and connecting to a Wi-Fi network (specify any);
- Region - you can specify "Russia". By the way, many routers don't even have such a parameter;
- Channel width, Channel- you can leave Auto and do not change anything;
- Save the settings.
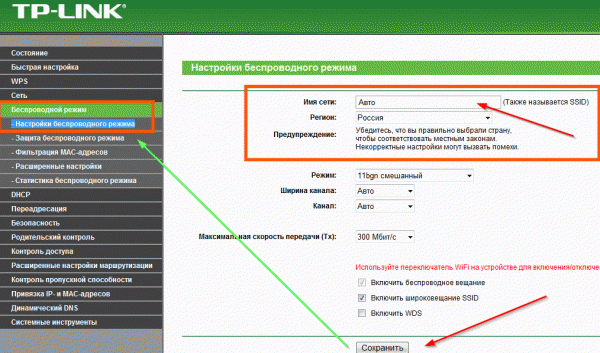
Rice. eight. Wi-Fi setup wireless network in the TP Link router.
Next, you need to open the tab " Wireless Security". Many people underestimate this point, but if you do not protect the network with a password, then all your neighbors will be able to use it, thereby lowering your network speed.
- Version: you can leave it unchanged and leave automatic;
- Encryption: also automatic;
- The PSK password is the password for accessing your Wi-Fi network. I recommend that you indicate something that is difficult to find with the usual search, or by accidentally guessing (no 12345678!).

Rice. 9. Setting the type of encryption (security).
After saving the settings and rebooting the router, your wireless Wi-Fi network should start working. Now you can set up a connection on a laptop, phone and other devices.
6) How to connect a laptop to a wireless Wi-Fi network
As a rule, if the router is configured correctly, there should be no problems with setting up and accessing the network in Windows. And such a connection is made in a couple of minutes, no more ...
First, click on the Wi-Fi icon in the tray next to the clock. In the window with the list of found Wi-Fi networks, select your own and enter the password for connection (see Fig. 10).
Rice. 10. Choosing a Wi-Fi network for connecting a laptop.
If you entered the network password correctly, the laptop will establish a connection and you can start using the Internet. Actually, this completes the setup. For those who did not succeed, below are some links to typical problems.

Laptop won't connect to Wi-Fi (can't find wireless networks, no available connections) -

Wi-Fi problems in Windows 10: network without internet access -
Setting up a router is not an easy procedure, but we are ready to help you understand all its intricacies. Just read the instructions below carefully, and then in just a few minutes you can easily set the desired parameters and get started!
#1. Connection
Before you independently configure the router through a computer, you need to connect it:
- Plug the internet cable into the WAN / Internet port;
- Install the end of the network wire to the LAN port of the device;
- Place the other end into the connector on the PC;
- Plug the model into a power outlet and press power on.
- Ready!
We hope that this short instruction helped you figure out the first steps, but for more details about the connection process, you can read on the website. Now you can safely proceed to the instructions, which tell you how to properly configure the WiFi router yourself.
# 2. Login to the web interface
We want to warn you that WiFi setup router online through the browser can only be done after turning on the device. When you activate the work, the distribution of the wireless network with factory parameters (login, password) will begin. You can change the settings of the router in a special web interface that each device is equipped with.
Important! To open the configuration interface, you need to connect your computer to the device. Internet access is not required.
To open the site for configuring the router, do the following:
- Open your browser;
- Enter the IP address in the address bar;
- In the window that opens, log in - enter your username and password.
- The address, network name and pin code for entering are indicated on a sticker located on the back of the router.
- Some devices do not have login information - they need to be set after logging into the interface.
Please note that some manufacturers set the parameters on their own - then nothing needs to be done during the initial start-up.
# 3. Setting instructions
Most routers have a special wizard option that will help you quickly set the desired parameters. For example, here, the item is called " Quick setup»:
The most important thing you need to configure is:
- Internet connection;
- Wi-Fi is a network.
Let's tackle the first parameter first. Our main goal is, of course, the work of the Internet on devices:
- Open the tab with general parameters... Most often they are located in the WAN or Internet section;
- Specify the type of connection of the provider, username and password - you can see the information in the agreement;
- If the provider requires you to go through the binding of the MAC address, specify the necessary data (from the contract).
Important! If the provider uses (DHCP), then the connection to the network will occur in automatic mode... Skip this section of the instructions, you do not need to reconfigure the router.
- Open the section called Wi-Fi. It may be called otherwise - Wireless / Wireless / Wireless mode;
- In the field "Network name" or "SSID" enter a new name (only in Latin);
- In the "Wireless network key" field, enter your invented identification code;
- Protection type - WPA2 - Personal;
- Change the region to the location on the appropriate line;
- Save your changes.
If you want to change the settings of the router, we recommend that you change the factory access code. This is important if you want to protect yourself from unauthorized entry. Here's how you can do it:
- Find the section for security or privacy settings;
- Change the data to a new, reliable code.
All of the above instructions apply if you need to set up a new router instead of the old one or install completely new equipment. By the way, we suggest you watch a general video on how to set up a router. It is perfect for those who are not confident in their abilities, because it shows the entire process step by step and in detail!
Now you know everything about how to set up the Internet on a Wi-Fi router through a computer - use our article to achieve the result. Just follow the instructions and in a few minutes you will be successfully online.
Wi-Fi provides fast wireless Internet access without being tied to wires or a modem. You only need a device with a Wi-Fi module - using it, several devices can connect to the network at once.
For correct setting the router does not need special education
Buying and configuring a router will take a little time and does not require any special knowledge. In order to consider in detail all the stages of connection, we will use the settings for the TP-Link brand models, which are most popular with a large number of users.
Before moving on to Wi-Fi installation, you need to figure out how to install the router and make sure it is working properly.
How to connect a Wi-Fi router? First, we choose a place for him - the main thing is that he does not stand on the table where the computer is located or on the system unit, because in such cases, interference often occurs. Therefore, we move it slightly away from other equipment and place it closer to the center of the house so that the waves cover as much of the area as possible.
To find out how much the router covers the room, after installation, download special applications- they will make the device work as efficient as possible.
On back side the router has the following connectors (in the basic version):
- 4 Lan - port for connecting to a PC. A maximum of 4 computers can be connected to one device at the same time. We insert the cable into one of the ports, connect the other part to the connector on the back of the system unit.
- A cable with an Internet connection is installed in the WAN cable slot.
- We plug the power cable into the socket.

Also here you will see a reset and an on / off button - their functions are clear. When you figured out the wires and inserted them where needed, an icon about a new connection will appear on the bottom of the desktop. Now we need to find out if your PC has installed the router correctly.
Device Manager - setting up a computer to work with a router
How to enter the settings of the router and check if the computer correctly recognized the equipment. Using the Control Panel, focusing on the chapter Network connections- if you have Windows XP, in Windows Vista / 7/8 this section is designated as "Network and Control", "Network and Sharing Center".
Here the actual connections will appear - select "Local Area Connection", look at the properties. You will now see a list of components where you stop at "Internet Protocol TCP / IP". Here we check how the checkboxes are indicated:
- Usually, the lines are highlighted in which we are talking about automatically obtaining an IP address and DNS server.
- For some providers, information is entered manually, so you will see the completed lines. Check them against the data in the contract or the instructions for the device, enter the correct numbers if they do not match.
The next step is to move on to how to enter the settings of the router.
Browser and parameters entry
The router is configured using a browser.
V address bar enter your IP address. In most cases, this is a combination of 192.168.1.1 - the standard version of the address, which, however, is different for some ISPs. After pressing Enter, you will see the Wi-Fi router settings. If this does not happen, then the IP address does not fit and you need to enter other numbers.

How to find the IP address:
- In the papers or on the back of the router.
- If, when entering the properties of "Local Area Connections", the IP-address field was previously filled in, and there was no automatic detection, copy it.
- Try checking other addresses - the last two values might look like 0.1, 0.2, or 1.2.
- Enter the action cmd in the command line (it opens through the "Start"), and then - ping 168.x.1, and you will be shown all the parameters of the device.
After entering the IP, a form for entering a username and password appeared in front of you. We fill both lines here with the word admin, after which the parameters of the router itself will appear directly.
Flashing equipment
First of all, setting up a router begins with flashing it to current version- after the release of each model, a lot of time passes, during which improvements are made, errors are corrected. Therefore, installing the most current version will avoid operational problems.
You can get it on the manufacturer's website. Download the file and go to the parameters again (you know how to enter the settings of the router through the browser) in System Tools, subsection Firmware Upgrade. Here we select "Browse ...", download the file and after clicking Upgrade, the update will begin.
Clarification: the firmware is optional, so you can do without it - it will not interfere with the operation of the device.
Internet connection setup
After rebooting the Wi-Fi equipment (it will happen automatically), we proceed to setting the parameters for accessing the World Wide Web. In the System Tools section, select the Password tab and enter, at your discretion, new data to enter the settings.
Now, in the Network section, we stop at the WAN graph, where we select the type of connection provided by the provider. Mostly this is a dynamic IP (Dynamic), but in some cases this option is not correct.
How do I know my connection type?
It is indicated in the documents along with the rest of the data for setting up a Wi-Fi router. If they are absent, find them on the website of the Internet service provider or contact a specialist by phone.
Note: if you need a different type of connection (not dynamic), add yourself Additional information into the fields located in this form after selecting the required parameter.
The rest of the fields when you select the Dynamic IP option will be filled in automatically.

Go to the Wireless section. We put a tick in front of Enable (if there is such a line), in the Wireless Network Name or SSID we come up with a name for the connection, which will be seen by everyone who wants to use Wi-Fi. Below there may be a tab for selecting your country - we indicate it, save the changes made and proceed to the next stage of our configuration.
Wireless Security - filling in this part of the parameters should be taken seriously, because here you can secure your network from unauthorized access. We select WPA / WPA2 and set a password in the PSK Password field - without it, no one can establish a connection with your Wi-Fi.
Optional: MAC Address and copying it
Sometimes providers tie a point Wi-Fi access to the PC network card. This equipment has a personal MAC-code, which we copy into the settings of the router - for this we need to press the "Clone MAC - Code" button.

Where can I find it? Depending on the manufacturer, the address can be located in different sections, mainly in Wireless. In the most common models of TP-Link, the MAC address is located in the Network folder, to copy it, you need to select a special column.
Wi-Fi router setup completed successfully. Confirm the reboot - the router will offer you to do it, then all the changes will take effect.
Wireless access is convenient, practical, it is easy to install such an Internet in your home, it takes a little time and a drop of effort. Now you know how to go to the router settings and fill in all the required fields to receive quick access no matter what part of the room you are in, and use the Internet on any device that supports this technology.
The Belarusian Internet provider Garant has a large number of tariff plans. They differ not only in width throughput channel but also the technology of connecting to the network. In addition to Internet access, the company also provides other telecommunication services: IP-TV and laying of communication lines.
Connecting the router to the Garant provider
The laying of the cable into the subscriber's house or apartment is carried out by the master of the Garant company. A standard network cable (UTP) is used for connection. The connector at its end must be inserted into a port on the router, which is usually marked with the inscription "Internet" or "WAN". Some router models do not have port type labels. In this case, use the outermost port, which is different in color or distance from the rest of the connectors.
In the remaining ports, connect home devices that require Internet access without Wi-Fi. If the device can establish both types of connections (via wire or wireless), it is better to connect it with a cable. This connection provides higher speed and better immunity to interference. When all wires are connected, insert the power supply Wifi router into a power outlet and press the power button. Downloading and establishing a connection will take some time - from 5 to 30 seconds, depending on the device model.

Important! The router can not be used if Wi-Fi is not needed, and only one computer is used to access the network. In this case, the cable can be connected directly to the Ethernet port on the computer's network card.
Further setting depends on the selected tariff plan that defines the type of connection. There are five different groups in the Garant tariff line, three of which are used most often:
- "Optimal" - Internet speed: from 3 to 10 Mbit / s, the IPoE connection standard is used.
- "Giant" - the bandwidth depends only on the capabilities of the network. There is a limit on the monthly traffic at the maximum speed.
- "Hit" - the speed is 25 or 50 Mbit / s, the connection is made via VPN. After using the allocated amount of traffic, the speed decreases.

Setting up an IPoE connection
Some Wi-Fi routers use the IPoE protocol by default. Therefore, when using tariffs with this type of connection, you will not need to further configure the Internet Garant. It only remains to ask Wi-Fi options: region, SSID (network name), encryption type and password. This is done through a browser, in the administrative interface of the router. In the address bar, enter the IP address shown on the bottom of the machine. Go to this address and log in with the username and password that are printed on the device under the IP.
If you don't have Internet access, the standard technology on your router is different from IPoE. Open the tab or menu item of the web interface responsible for the settings global network... For example, on TP-Link Wi-Fi devices, this is "Network -> WAN". In the drop-down list, select the connection type "Dynamic IP-address" and click the "Save" button. At the top of the window, a message will appear asking you to restart the router. Confirm the restart, then wait for the restart and check the Internet.

Advice! Make sure the DHCP server is enabled in the router settings. It assigns local IP addresses to connected devices used to access home network and the correct operation of the Internet.
Tutorial video: Configuring a router for a Garant provider
Specifying VPN Settings
For plans with VPN access, you will need to enter additional settings... On the same tab ("Network -> WAN") select the connection type "L2TP / Russia L2TP". Enter the username and password specified in the contract. In the "Server IP address" section, enter "unlim.vpn" (if there are no traffic restrictions in the tariff) or "vpn.vpn". Next, go to the "Network -> Cloning MAC Address" tab. Contact the provider's support and dictate the address to the specialist, which is displayed in the first line.
Access to the Virtual Private Network on a separate computer needs to be configured only if a router is not used. For this, the provider has developed a separate utility. It sets the parameters with which you can connect the device to the network. Choose your operating system For more information, see the “Setting up the Internet” section on the company's website. Download the "VPN Garant Internet" application, open the file and click "Yes" in the dialog box that opens. After installing the utility, run it and enter your account information.