How to change the home screen. Share not your phone, but the app
In four years, from a small but ambitious project, Android has turned into perhaps the most complex and full of functionality mobile OS of our time. Android has support for a huge number of technologies and functions, many of which are hidden from the user or hidden where you would not even think to look. This article is a collection of tips and tricks that can be applied to any Android device without having to get root.
01. DISABLE AUTOMATIC DESKTOP ICON CREATION
I think I'm not the only one annoyed by how the market behaves when installing the application. For some reason, he thinks that for any slightest software or the next game, I definitely need an icon on the desktop, and he successfully creates it. And I have to delete it. And then another one. And so every time.
Fortunately, this behavior is easy to disable - just open the settings Google play(on the left panel) and uncheck the "Add icons" item. There you can also turn off the forced password request every 30 minutes when purchasing applications, as well as the hated auto-update of applications.
02. DISABLES GOOGLE SEARCH AND OTHER USELESS SOFTWARE
The standard firmware of Android smartphones includes a huge amount of useless software, starting from a bunch Google applications(do you know that Google requires manufacturing companies to include almost all the software developed by it in the firmware of their devices?) and ending with all sorts of junk from the smartphone manufacturer. All of this (or at least most) can be turned off.
Go to "Settings → Applications → All", tap on the desired software and click "Disable" (of course, you will be warned how "dangerous" it is). By the way, when disconnecting google search Google Now will also disappear, as well as the search bar from the desktop (after a reboot), instead of which an empty area will remain.
03. RESTART IN SAFE MODE
Few people know, but Android, like many other operating systems, has a so-called Safe mode. This is a mode in which the operating system boots with disabled third party applications... Malware that is not very skillfully written (the one that is not registered in the system partition) falls off, like any software that interferes with the normal operation of the system. Safe mode can be used to bypass screen lockers, apps that freeze the smartphone, or, alternatively, to identify who is actually eating the battery - the next firmware or software update.
The mode is turned on in a fairly simple, but not at all obvious way: by pressing the power button and then holding your finger on the "Turn off the power" item. After rebooting, the culprit of the problem can be removed through "Settings → Applications".
04. REMOVE OBSTANCED NOTIFICATIONS
"Construction of the castle is over!" - how did you get these notifications. All and sundry are trying to notify me about all possible and impossible events: "Vasya Dzhubga answered you on Twitter", "You have 100,500 new messages", "You won the surgery to enlarge your right leg." You swipe one notification, three new ones appear in its place.
How to get rid of all this slag: hold your finger on the notification for a long time and uncheck the box under the "Stop" button. This is a recipe for KitKat. In Lollipop, everything is a little different, but the essence is the same: hold down, then the i button, in the window that opens, put a check mark on "Block". There, you can also force the notification to be prioritized so that it is always at the very top.
05. DON'T FORGET ABOUT THE SERVICE MENU
Another not at all obvious function is service menu... It can be opened by dialing the number * # * # 4636 # * # *. Basically there are different Technical information like IMEI numbers, signal strength, current location, or network type. But there is also a function of forced switching of the smartphone to the required type of network (2G, 3G, LTE), which is very useful for some situations.
In conditions of a poor 3G / LTE signal, the device tends to reset to 2G in order to conserve battery power and ensure subscriber availability. This behavior can be disabled. Open the service menu and select WCDMA only or LTE only in the "Configure preferred network type" item. In the same way, you can switch your smartphone to 2G - GSM only. It will help if you need to save battery power and the Internet is rarely used. By the way, in the same place you can turn off the radio module altogether (of course, until the next reboot). 
Smartphones based on Chinese MTK chips have their own and much more sophisticated service menu. His number is * # * # 3646633 # * # *. There are different system information and a huge number of tests, among which you can find several useful settings, such as adjusting the volume level during a conversation or, for example, changing the GPS / AGPS settings. The menu itself is terribly illogical and contains so many differently shaped information that I do not even dare to describe it, but simply send the reader three letters - XDA.
06. USE THE STANDARD BROWSER
Don't know why users hate inline so much android browser... In my opinion, he is beautiful. Lightweight, fast, on Chromium engine, can sync with your Google account (that is, it immediately includes all bookmarks and passwords from Chrome), but most importantly, it has a very convenient and almost ingenious navigation method. This is the so-called radial menu that can be activated in the settings (only in Android 4.0-4.4).
07. MANAGE YOUR CONTACTS WITH YOUR COMPANY
In the Google piggy bank there are web services not only for remote installation of software, blocking and searching for a smartphone, but also for managing contacts. All contacts of people ever saved and synchronized when connecting a new smartphone can always be found at google.com/contacts. They can be viewed, edited, added and removed. And, oddly enough, in fact, this is part of Gmail.
08. FOLLOW UP THE PROCESSOR
Android has a built-in feature to show the current CPU load and currently active processes on top of the screen. In theory, it is intended for developers of applications and firmware and is hidden from ordinary users, but no one bothers us to activate it. But first you have to reach out to the "For Developers" section of the settings, which by default does not exist at all.
We go to the settings, then "About phone", find the line "Build number" and tap on it seven times in a row. The message "You have become a developer!" Should appear on the screen. This means that the item "For Developers" is now open, and we are going to it. We rewind almost to the very bottom of the screen and in the "Monitoring" section we find the "Show CPU load" switch.
Turn on and see the list in the upper right part of the screen. The first line is the so-called loadavg, showing the number of processes that had to run or wait for their turn to run in the last minute, five and ten minutes. To put it quite roughly: if these values divided by the number of processor cores are higher than one, this means 100% processor load in the last minute, five or ten minutes, respectively. Below is a list of the most voracious processes (in fact, the analogue of the top command from Linux).

09. USE ADB TO BACKUP SOFTWARE ON THE COMPUTER
We have already written more than once about a wonderful tool called ADB, which can significantly simplify device management from a computer for a person who is familiar with the console (here we are mainly talking about Linux, of course). In addition to the ability to install software, transfer files to a smartphone, view logs and other utilities, recently ADB allows you to backup all settings and applications of a smartphone.
To use this functionality, install the universal ADB driver (goo.gl/AzZrjR), then download the ADB itself (goo.gl/3P7klM), install the driver, then expand the ADB archive, connect the smartphone to the computer with a USB cable, run command line and execute the command
A message will appear on the smartphone screen asking you to specify the encryption password for the backup - you can safely press "Next". The process of backing up applications will begin, which will affect both the APK packages themselves (the -apk flag in the command) and their settings. All applications from the memory card will also be included in the backup. You can restore a backup using the following command:
$ adb restore backup. ab |
10. DISABLE BACKGROUND DATA TRANSFER IN APPLICATIONS
Working in the background, applications can actively use the Internet for a variety of purposes, from updating their content to leaking information about your location. In addition, such activity in any case leads to an increased consumption of battery power. 
Android has the ability to selectively restrict applications for transferring data in the background, but it is located in a place where most users would hardly ever look. To prohibit any application from using the Internet in the background, you need to go to the settings, then - "Data transfer", scroll down the screen to the list of actively using the network of applications (for some it will be a surprise that it is there at all) and tap on the desired software. At the bottom there will be an option "Limit background". It should be borne in mind that the option will disable data transmission only over the mobile network, so by Wi-Fi data will continue to flow.
11. USE THE SEARCH BAR
Often, smartphone owners on Android base neglected search bar at the top of the home screen. This is really logical, given the ability to perform a search by driving a query into address bar any mobile browser.
The desktop search bar, meanwhile, does a lot more than just redirect a request to google.com. It allows you to search your contacts, apps, calendar events, bookmarks, and web browser history in automatic mode... With normal smartphone use, it may not be so useful, but when connected external keyboard it is an indispensable tool. Just click
12. YUZAI SMART LOCK
Smart Lock is one of those functions that you don't think about, but having tried it once, you can no longer live without it. This is one of the most notable new additions to Android Lollipop and one of the most useful features added to Android in recent times... The idea behind Smart Lock is extremely simple - it disables the pin code or other lock screen protections if there is a specific Bluetooth device or location on the map nearby.
By default, Smart Lock is "kind of" disabled. That is, it does not light up anywhere, but after pairing with a new Bluetooth device (of any type), it will definitely offer to add it to your whitelist. After that, you will forget about her again. But only until you turn on the lock screen protection in the "Security" section of the settings. Now it will work as it should.
Sami Smart settings Lock is located in the same section, and, in addition to adding new Bluetooth devices, you can specify "safe places" there, and immediately with a list of options based on the "observations" of Google Now. By the way, if you disable it, as described in the first tip, then this functionality will be lost.
13. SAVE ENERGY RIGHT
Another notable innovation in Lollipop is the Power Saving Mode. V standard Android it migrated from the firmware of smartphone manufacturers, who used to implement it on their own. Now the function is in pure android- you use your smartphone to the fullest, and when 15% of the battery charge is reached, the system offers to turn on the power saving mode, which turns off the background data transfer, reduces the brightness to a minimum, turns off some sensors and reduces the FPS of screen rendering to a couple of tens of frames per second. For clarity, the status bar and on-screen buttons at the bottom of the screen turn red - so as not to forget.
To save battery life on your AMOLED smartphone, you can set a black wallpaper and use apps with a black background.
Energy saving mode is configurable. Go to Settings → Battery → Menu → Power Saving Mode. Here you can specify the condition automatic switching on mode (however, the choice is meager: 5%, 15% or never) and, most importantly, turn on the mode right now. It is very convenient if you have to travel for a long time without the possibility of recharging.
14. FOLLOW TRAFFIC
Most likely, smartphone manufacturers, as usual, will shovel the standard Android 5.0 interface and change everything (hello Samsung - the biggest fan of breaking interfaces), but in the standard Lollipop shutter, or rather, in the "second curtain" with  opokami quick settings there is one twist. The data transfer button in the center does not switch the data transfer at all, but expands into an interface that allows not only viewing the current traffic consumption, but also turning off the data transfer using the switch on top.
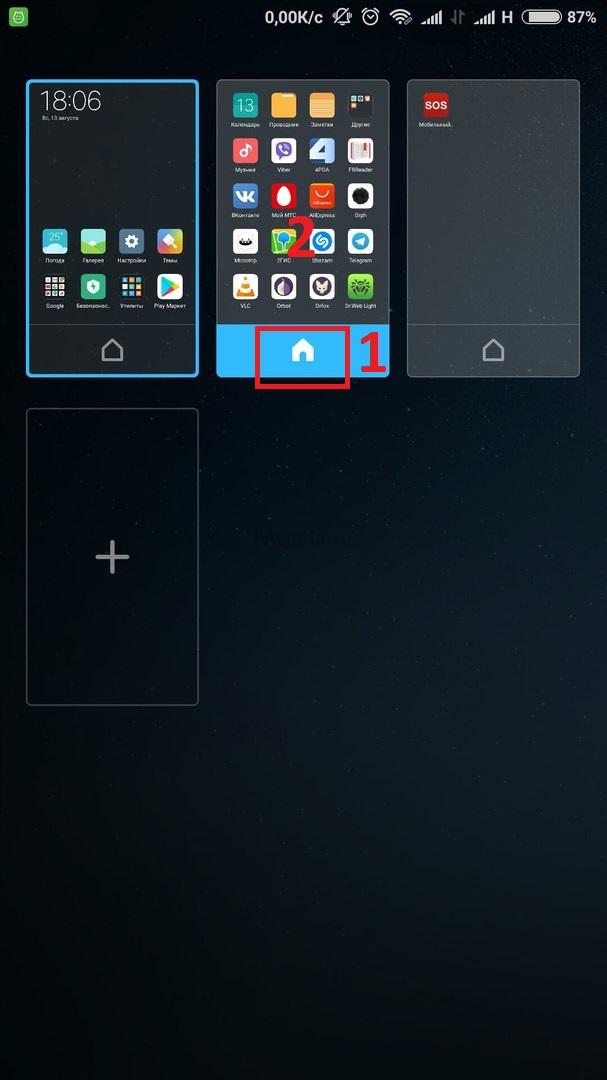
15. SHARE AN APP, NOT A PHONE
Especially for those who like to give their phone to other people, Lollipop has a Screen pinning function that allows you to lock your smartphone on one application without the ability to close it or switch to another. Like many other usefulness, it is completely invisible and hidden quite deep in the settings. To activate, go to "Settings → Security", wind almost to the very end and turn on the "Lock in the application" option.

Now, if you press the button for viewing running applications ("Browse"), a end button will appear at the bottom of the thumbnail of the current application. After clicking on the icon, the screen will be locked on the selected application and to go back, you will need to hold the Back and Browse buttons at the same time. In this case, you will have to enter a pin code if it is set for the lock screen.
XX. USE ACITIVITY LAUNCHER
Any graphic Android app includes one or more so-called "activities" (activity). Each of them is an application window (screen), for example, the main screen or the settings screen, maybe even a file selection window. By default, you can open directly (from the desktop) only those activities that the application developer will mark as main (main), the rest are available only through the application itself and only if the developer himself allows it.
However, having the right tool at hand, you can reach any other activity of any application and even create a shortcut for it on the desktop. The Activity Launcher does exactly that. Just install the application, select "All Actions" from the menu above and find the software you need. All her activities will appear on the screen, and any of them can be opened with a simple tap or hung on the desktop with a long finger hold.
An example of useful "internal" activities is the Chrome bookmarks window (Chrome → Bookmark), access to the hidden AppOps mechanism in Android< 4.4.2 (Настройки → AppOps), запуск поиска в TuneIn Radio (tunein.ui.activities.TuneInSearchActivity). Очень много активностей имеет в себе ES Проводник, включая редактор, музыкальный плеер, просмотрщик изображений и многое другое. Любую из них можно запустить напрямую с рабочего стола. Таким же образом можно открыть любой раздел настроек и получить доступ к некоторым функциям ОС, достучаться до которых проблематично. Это абсолютно легальная функцио нальность, и она не требует root.
Android has a large set of keyboard shortcuts for pluggable keyboards. You can use the arrows, Tab and Enter to navigate the desktop and various menus. In addition, the following key combinations are available:
Esc - Back button;
Win + Esc - Home button;
Ctrl + Esc - Menu button;
Alt + Tab - switch between applications;
Ctrl + Space - switch layouts;
Ctrl + P - open settings;
Ctrl + M - manage installed applications;
Ctrl + W - change wallpaper;
Win + E - write a letter;
Win + P - music player;
Win + A - calculator;
Win + S - write SMS;
Win + L - calendar;
Win + C - contacts;
Win + B - browser;
Win + M - google maps;
Win + Space - search;To find out your MAC and IP address, go to Settings → Wi-Fi → menu → Advanced
functions ". MAC and IP will be at the very bottom.Lollipop has a built-in Flappy Bird style game. Go to "Settings → About phone",
we tap several times on the item “ Android version", Then hold your finger on the" chupa-chups "that appears. We play.Google Now supports a large number of Russian-language voice commands. All of them can be divided into two groups: voice search and the actual voice commands themselves. Voice search allows you to perform smart searches on Google, when the system displays a specific answer instead of a list of links, and voice commands allow you to perform certain actions, for example, send an SMS or set an alarm. The list of commands is shown in the image "Google Now Voice Commands". Voice search includes more than a dozen different types questions:
Weather. What is the weather tomorrow morning?
Addresses. Where is the nearest pharmacy?
Flight information. When does Aeroflot flight number 2336 depart?
Time. What time is it in London?
Developments. When does the sun go down today?
Calculations. What is the square root of 2209?
Translation. What is the Spanish word for cucumber?
Sport. When does Spartak play?
Finance. What is the S&P 500 index today?
Facts. What is the height of the tallest building in the world?
Exchange Rates. Convert 2600 rupees to US dollars.
Images. Show photos of the Golden Gate Bridge.
Interestingly, in English, Google Now understands a large number and much less obvious questions. An example can be given:
Should I wear a jacket today?
How much is a tip from 420 rubles?
Where is my parcel?
This, of course, is not all that could be talked about, but it will not work to stretch the article, and many of the other possibilities are already known. Do not forget about these tricks, and the smartphone will become
a little more convenient. at January 26, 2017.
In MIUI, on Xiaomi phones, there is no menu familiar to all Android users. Instead, there is work tables where all installed applications... At first, this seems pretty awkward. But, after a while, you no longer want to return to the previous menu.
To call the desktop settings, you need to pinch with two fingers on the desktop from the edges to the center. This movement is exactly the same as if you want to zoom out in the gallery.
1. Desktop menu
In desktop settings latest versions MIUI, there are 4 main points. Let's start in order, from left to right:
- Effects
Here we can choose a theme for your device. This menu duplicates the one located along the path Settings -> Themes. We will not dwell on it in detail. I think everything is clear.


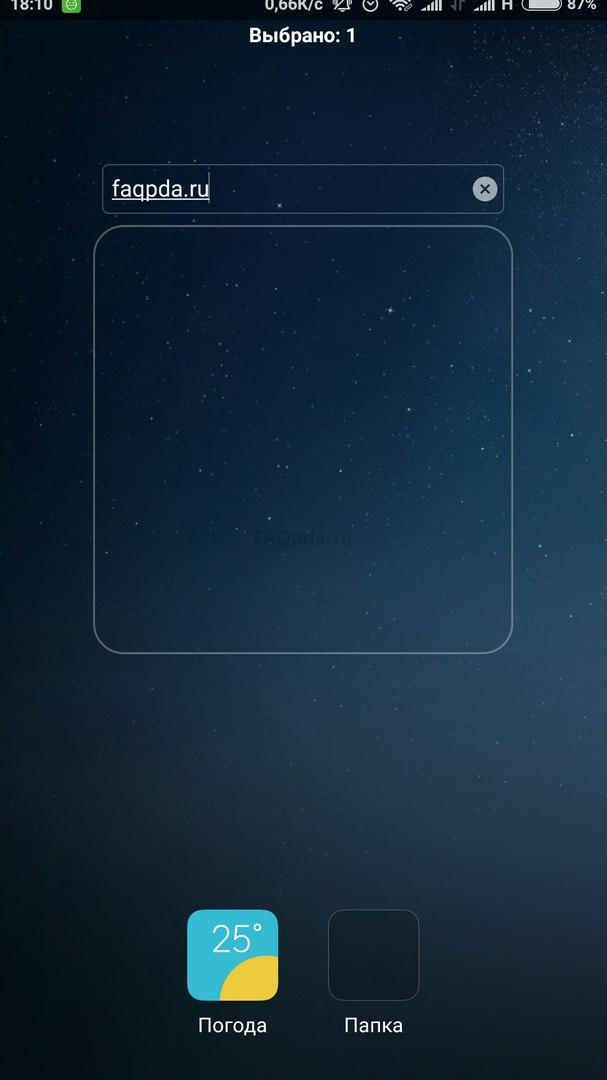
A widget is a part of an application or an independent application that can be placed on the desktop and contain any information. For example, weather, hours, exchange rates, news and more. They make it easy to access settings and switches.
To place a widget on the desktop, you need to go to "Widgets" and select the one we need.

For example, let's display a widget with which you can turn Wi-Fi on and off:

Now you can access it very quickly.
In this way, you can display any widget on the desktop. There are a lot of them even on the phone you just purchased. And after installing applications, there will be even more.
To delete a widget, just press and hold on it for a while, and then, without releasing, drag it to the top of the screen, to the trash can icon. In the same way, you can remove any icon from the desktop.

Naturally, you can always get it back by going to the "Widgets" section.
Wallpaper
Here you can choose your desktop and lock screen wallpaper. The list is standard. However, you can open the "Online" tab and download what you like.


Effects
These are the effects that will occur when scrolling through desktops. For example, "turn", "cascade", "rotation", "3d cube", etc. Try to select any of them and move from one table to another.


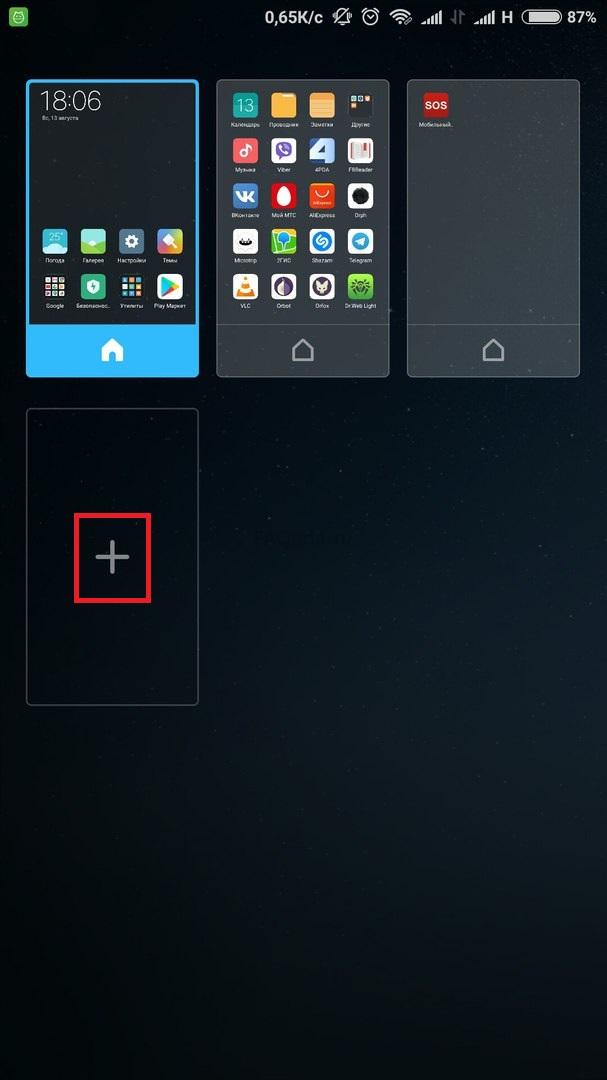
When the desktop is full, the application icon is automatically created new table... But, if we want to create it ourselves, then we need:
- Pinch with two fingers and scroll all the desktops to the end, left or right. And then, just click on the plus icon. This is how we created a new desktop.


There is another way to add a table. It will be discussed in the next paragraph. About, how to add a new MIUI9 desktop, you can read.
If you have several desktops, then when you press the touch button "Home", by default, the first one always opens. But what to do if you need to open, for example, the second or any other. To do this, you need to assign the main desktop:

By clicking on the desktop with "Plus", we will add a new table in the same way as we did in step 2.
Here, we can change the desktops of the place. To do this, click on any of them and move to the desired location.
4. Sorting icons on the desktop
There are 2 ways to sort icons:
- Within one table. To do this, simply press and hold your finger on the icon, and then move it to the desired location.
- Move to another desktop. For this:

To do this, there are also two ways:


To rename a folder, go into it and click on the name. We set any.
Folders are deleted in the same way as other icons.
That's all. I hope this article will be useful for beginners.
If you have long been tired of the standard home screen view on your smartphone or tablet running Android, it can be easily changed. This will set up appearance and the performance of your phone. There's a lot good options which will offer you other icons, widgets, functions and features for your home screen.
Launcher change
Go to Settings> Apps> App Settings> App Permissions. Of course, it should be borne in mind that the location of these parameters may vary depending on your device.
From here, you can choose your own launcher that comes with the device, or another, which is worth downloading in advance from the Android library. Remember that you can always go back to the previous launcher if you don't like the new one.
Finding good launchers

Now it's time to find launchers. The best ones are always paid, but there are interesting examples among the free options. Browse the PlayMarket library. The most popular ones are always at the top, so you won't have to search for a long time. After downloading a couple of, go to Personalization> Cool app launchers and choose your favorite.
If you want to stay close to Google, there is always a Google Now Launcher. However, the icons look a little larger on some large phones and doesn't offer as much customization as other launchers.
By setting new launcher, you can choose to use it just once for a trial or set it as the main default.
Data-lazy-type = "image" data-src = "http://androidkak.ru/wp-content/uploads/2015/12/rabochie-stoly..png 400w, http://androidkak.ru/wp- content / uploads / 2015/12 / rabochie-stoly-300x178.png 300w "sizes =" (max-width: 300px) 100vw, 300px ">
 Have operating system Android has a lot of advantages that make working with phones or tablets much more convenient. One of these advantages is the ability to use multiple desktops at the same time. This is very convenient, because you can put all the widgets you need on them so as not to look for any information for a very long time. For example, on the screen of your device there is a clock and necessary applications. A gesture to the right - and the weather is in front of you. Another flip, and it becomes possible to listen to music.
This function is very useful for those who do not want to go to different sites, go to various applications to find out any information. This opportunity is provided to the owners of the android, because all this information can be added in the form of widgets and shortcuts to the smartphone screen. But, of course, it is worth remembering that the space is limited and needs to be increased in some way. But sometimes, on the contrary, there is too much space. There is a need to reduce it.
Some people have a question: how can you add a new workspace on a phone or tablet or remove it (for many inexperienced users, they appear imperceptibly, and owners of phones and tablets simply do not know how to remove them)? We'll figure out.
How to remove an extra desktop
All smartphones are different, so the methods will be different, but one of them will definitely work:
- On many devices, you can remove an extra desktop in just two swipes. To do this, put two fingers on opposite ends of the screen and pinch them together(the same gesture that you perform in order to zoom out). You will see all the tables that are in front of you. To remove the unnecessary, long press on it and drag it to the trash can icon with the inscription “delete” (sometimes the inscription may be absent).
- The second method differs from the first only in the first action. We exit to the main screen, press the “Home” button, and then repeat all actions from point 1.
- Some smartphones do not support adding or removing workspaces. But you should not despair, launchers can come to help us in this, of which there are a great many in Play Store... Install them and add yourself as many desktops as you like.
The android operating system has always been famous for its flexibility and abundance of settings. For many, this is a definite plus. You can adapt the device for yourself. If the user first encountered this system, he may have a number of questions. To prevent this from happening, consider what the android configuration includes.
When you turn it on for the first time, the device will ask you to make the minimum settings. You cannot refuse this. First, you need to select the interface language. The main thing in this matter is not to rush. If you accidentally choose, for example, Chinese, then it will be difficult to find the corresponding menu item and return to Russian.
Next, the device will prompt you to enter data Google account... The procedure can be skipped, but it is not advisable to do so. Without an account, you will not be able to download games, use mail, maps and other applications from the Play Store. If you don't have an account, you can quickly register it (you can read about it in our separate page). The process is quite simple and takes no more than five minutes.

After authorization, the device will ask a few more questions that need to be answered positively. Particularly important is the point regarding data backup. Be sure to check the box. Happens in life different situations... The phone can be stolen, drowned, broken, or simply accidentally erased information. Backup will allow you to protect yourself from the loss of important data. It will be enough to log in from any other device or computer and restore all the necessary data.
This completes the initial setup of the android. A welcome message is displayed on the display, after which you can start using the gadget. On different versions operating system, the process may be slightly different. Despite this, the main stages remain unchanged.
Above, we have considered only the basic settings that are required to enable the gadget. This stage can only be considered the beginning. There are still many parameters ahead that can be changed depending on personal preference.
Top curtain on the screen
This is a very handy and useful tool that you can open with a swipe. Just swipe down from the top of the screen. The curtain includes a menu with the most requested settings. Depending on the company, device model and firmware version, the set of tools may differ. In most cases, the curtain contains the following buttons:
- Silent mode. A very convenient button that allows you to turn off all the sounds of the device at once. This feature can be useful during meetings and other situations where complete silence is required.
- Flight mode. By activating this key, the phone completely loses mobile network... No one will be able to call the user and send an SMS message. In this case, the phone remains switched on and can be used as a multimedia device.
- Bluetooth. Allows you to quickly start data transfer without going into basic settings.
- Adjust the brightness using the slider. This parameter can be adjusted several times a day. This is due to the amount of light in the room and the charge level of the battery.
- Enabling and disabling the Internet. Also a handy feature that allows you to save traffic mobile internet and battery charge.

Android home screen
The home screen consists of one or more desktops. They are required to accommodate the most requested icons. Adding and removing desktops is done differently depending on the launcher. On certain models, the menu is called up by pinching the screen. After that, all desktops appear on the screen and it is possible to add new ones. On other gadgets, you need to move the application icon to an area where there is no desktop.

All androids have the ability to add widgets. This allows you to read important information directly from your desktop. There are many widgets available. Among them, you can find clock, weather display, recent messages, system settings, music player and much more.

Main menu of device settings
To make a finer adjustment of your device, you need to go to the "Settings" item. This is a kind of gadget control center. All available functions are concentrated there. Below we will consider them in more detail.

Wifi
To connect to wireless network, you need to click on this icon. Next, move the slider to the active position. The system automatically starts scanning for available networks. The display will show a list of found networks. There are unsecured connections. In most cases, they are located in public places (cafes, restaurants, hotels). To connect to them, just one click. The situation changes if a lock-shaped icon is displayed next to the connection. This means that this network is password protected. After entering the password, you can freely use the Internet.

V Wi-fi settings there is a very useful item - "Included in sleep mode". By activating this function, Wi-fi will turn off when the phone is at rest. This saves battery power.
Screen
Special attention should be paid to setting up the screen. Firstly, this is a key part of the android, and secondly, it is the main consumer of energy.
It is possible to change the following parameters:

- Wallpaper. The user has the right to install any image on the desktop of the device. Factory screensavers are not original, so they get bored quickly. With this feature, you can set any photo or positive picture on the home screen. In addition, there are live wallpapers that are made in the form of animation.
- Sleep mode. This function allows you to set the period of time after which the phone will go into sleep mode. If you do not touch the phone for a specified time, it will turn off the backlight itself and lock the screen.
- Brightness. The brightness of the screen affects your vision and the duration of work on a single battery charge. Setting is done by moving the slider. There is also an item "Auto-tuning". If activated, the display will change its brightness depending on the lighting level in the room.
- Auto-rotate the screen. A very handy feature. The screen is automatically reoriented depending on the position of the smartphone in space. If necessary, this function can be disabled.
Sound
The capabilities of the android allow you to set any melody for incoming calls, messages, alarms, etc. In addition, the volume level can be set for each category of sounds.
All smartphones have the ability to enable or disable vibration when calling. The "Silent Mode" switch turns off all sound signals in the device.

Special abilities
This menu may differ depending on the functionality of a particular gadget. On top models, you can activate call acceptance by shaking your phone and much more. These functions are optional and rarely used in practice.

Security
If your smartphone contains important information, you need to take care of security. The android system offers a number of solutions for this:
- graphic key;
- digital password;
- alphanumeric password;
- fingerprint scanner (if this function is available in the device).

This is quite enough to protect the gadget from unauthorized access. In addition, the device tries to protect itself from all kinds of viruses. Therefore, the key " unknown sources". By default, android does not allow installing apps from third-party sites and other sources. to install third party program, you need to activate this function.
date and time
There are a number of cases when the date and time on the device is lost. You can customize them in the main menu. To do this, just click on the appropriate tab and indicate the current digital values. You can go over simple way... By activating the function "Date and time of the network", the device will synchronize the time from the Internet.

Battery
Here you can not only see the state of the battery, but also reduce its consumption. For this, a special tab "Energy saving" is provided. By clicking on it, we will see several ways to optimize consumption:
- limitation of the processor;
- decrease brightness, turn off screen rotation and decrease backlight time;
- disconnection of the Internet, Bluetooth and navigation;
- disable vibration alerts and vibration in applications.
You can activate all categories at the same time or select one. Unfortunately, the battery saver feature is only present on newer versions of android.

Applications
This is one of the main menu items. From here, all applications of the device are managed, as well as deleted. If the device is not equipped with sufficient volume random access memory, you need to look at the "Working" tab. The currently active applications will be listed there. They can consume a lot of resources and cause the device to slow down. To fix this, the user needs to stop working. unnecessary applications... Often times, you can see unused and useless programs there.
Each manufacturer produces gadgets with a specific set of built-in applications. In most cases, they turn out to be of little use and take up extra space. Some of them can be removed. To do this, find the application and click on it. Next, a window will open in which you need to click the delete button and confirm your actions. Thus, it is possible to release internal memory and clean the phone from "rubbish".

Developer settings
For advanced users, there is a separate menu item. Initially, it is not displayed on the system. To use it, you need to find the "About phone" tab and then "Build number". After that, click on it about ten times. The screen should display the words "You have become a developer." After that, the hidden settings will become available.
Many functions can be activated here. For example, change the speed of graphic effects, set a limit for background processes, and much more. The main thing is not to press everything. This may affect the performance of the device.

Installing the launcher
Android device manufacturers are trying to stand out and create an individual graphical shell. In this regard, on all devices, menus, icons, buttons and other elements look differently. In some cases, the factory shell can be boring and ineffective. Get upset in this case not worth it, since this operating system allows you to install any design. It is enough to go to the app store and download the launcher you like. This is not just a design theme, but a radically new system shell. As a result, the user can set the design to his liking.

Settings with Root rights
By setting this type of rights, the user gets unlimited access to system files. As a result, you can delete system files, adjust the processor frequency, change the built-in system sounds, and much more.
It is necessary to use root rights very carefully. Careless actions can cause the device to malfunction. It is also worth remembering that the installation of root rights entails the loss of the manufacturer's warranty. You can read more about root rights on our website in the corresponding article.
Reset
If the android settings are not correct and there is no desire to correct your mistakes, you can do a reset. This will lead to the fact that all previously made changes will be reverted to the factory settings. But it is worth remembering that this erases some of the data that is stored in the gadget's memory. Therefore, before resetting, you must do backup the whole important information... He often helps in troubleshooting problems related to incorrect work devices. How to do it correctly - read in our

Conclusion
Devices running on the android operating system have an unlimited number of settings. In this case, it is not at all necessary to use them all. This abundance is not created to complicate the life of the buyer, but to provide him with ample opportunities to personalize the device. For normal use, it is enough to set the date, time and create an account from Google. And then, at any time, if you want to use the full potential of the system to produce the finest setting devices.